If you write software, chances are you’ve come across Continuous Integration, or CI. You might never have heard of it – but you wonder what all the ticks, badges and mysterious status icons are on open-source repositories you find online. You might hear friends waxing lyrical about the merits of CI, or grumbling about how their pipeline has broken again.
Want to know what all the fuss is about? This article will explain the basic concepts of CI, but will focus on an example, since that’s the best way to understand it. Let’s dive in.
What is CI anyway?
The precise definition of Continuous Integration refers to the practice of software developers frequently checking in their code, usually multiple times a day in a commercial setting, to a central repository. When the code is checked in, automated tests and builds are run, to verify the small changes which have been made. This is in preference to working on a ginormous slab of code for a week, checking it in, and finding out it fails a large number of tests, and breaks other people’s code.
Whilst this is a valid definition, colloquially CI has become synonymous with the automation part of this process; when people refer to CI, they are often referring to the tests, builds, and code coverage reports which run automatically on check-in.
Additionally, CI is often lumped together with its sister, Continuous Deployment (CD). CD is the practice of deploying your application automatically: as soon as your code has been pushed to the correct branch and tests have passed. We’ll talk more about this soon.
Case study – a simple API
I’m going to save any more explanation or discussion of the merits of CI until after we’ve seen an example, because this will make it easier to picture what’s going on.
The aim of this example is to make a very simple Python application, then use CI to automatically test it, and CD to automatically deploy it. We’re going to use GitLab CI, because it’s a neat, integrated solution that is easy to setup. You can view the finished repository containing all the files here.
Let’s start by creating a Python file containing our main application logic. In this case, it’s some string processing functions.
""" web/logic.py. Contains main application code. """

def capitalise(input_str):
    """Return upper case version of string."""
    return input_str.upper()

def reverse(input_str):
    """Return reversed string."""
    return input_str[::-1]
Let’s also add some extremely basic tests for this code:
""" test_logic.py. Tests for main application code. """

from web import logic

def test_capitalise():
    """Test the `capitalise` function logic."""
    assert logic.capitalise("hackaday") == "HACKADAY"

def test_reverse():
    """Test the `reverse` function logic."""
    assert logic.reverse("fresh hacks") == "skcah hserf"
    assert logic.reverse("racecar") == "racecar"
Ok, now that we’ve made our main application code, let’s expose it over an API. We’ll use Flask for this. Don’t worry about meticulously reading this, it’s just here to serve as an example, and is shown here for context.
""" web/api.py. Expose logic functions as API using Flask. """
from flask import Flask, jsonify

import web.logic as logic

app = Flask(__name__)


@app.route('/api/capitalise/<string:input_str>', methods=['GET'])
def capitalise(input_str):
    """ Return capitalised version of string. """
    return jsonify({'result': logic.capitalise(input_str)})


@app.route('/api/reverse/<string:input_str>', methods=['GET'])
def reverse(input_str):
    """ Return reversed string. """
    return jsonify({'result': logic.reverse(input_str)})


if __name__ == '__main__':
    app.run()
Note that we should test the API as well (and Flask has some nice ways to do this), but for conciseness, we won’t do this here.
Now that we have an example application setup, let’s do the part we’re all here for and add a CI/CD pipeline to GitLab. We do this by simply adding a .gitlab-ci.yml file to the repository.
In this explanation we’re going to walk through the file section by section, but you can view the full file here. Here’s the first few lines:
image: python:3

stages:
    - analyse
    - test
    - deploy
This sets the default Docker image to run jobs in (Python 3 in this case), and defines the three stages of our pipeline. By default, each stage will only run once the previous stage has passed.
pylint:
    stage: analyse
    script:
        - pip install -r requirements.txt
        - pylint web/ test_logic.py
This is the job for our first stage. We run pylint as an initial static analyser on the code to ensure correct code formatting and style. This is a useful way to enforce a style guide and statically check for errors.
pytest:
    stage: test
    script:
        - pip install -r requirements.txt
        - pytest
This is our second stage, where we run the tests we wrote earlier, using pytest. If they pass, we continue to our final stage: deployment.
staging:
    stage: deploy
    script:
        - apt-get update -qy && apt-get install -y ruby-dev
        - gem install dpl
        - dpl --provider=heroku --app=hackaday-ci-staging --api-key=$HEROKU_API_KEY

production:
    stage: deploy
    only:
    - master
    script:
        - apt-get update -qy && apt-get install -y ruby-dev
        - gem install dpl
        - dpl --provider=heroku --app=hackaday-ci-prod --api-key=$HEROKU_API_KEY
Our aim here is to deploy the API onto some kind of server, so I’ve used Heroku as the platform, authorised with an API key.
This last stage is slightly different from the others because it contains two jobs that deploy to two places: staging and production. Note that we deploy to staging on any commit, but we only deploy to production when we push to or merge into master. This means that we can check, test and use our live app in staging after any code change, but the production app isn’t affected until our code is merged into master. (In a larger project, it often makes more sense to deploy to staging on master and only deploy to production when a commit is tagged.)
And that’s it! In less than 40 lines we’ve defined a completely automated system to check and deploy our code. We are rewarded by our pipeline showing up in GitLab as below:
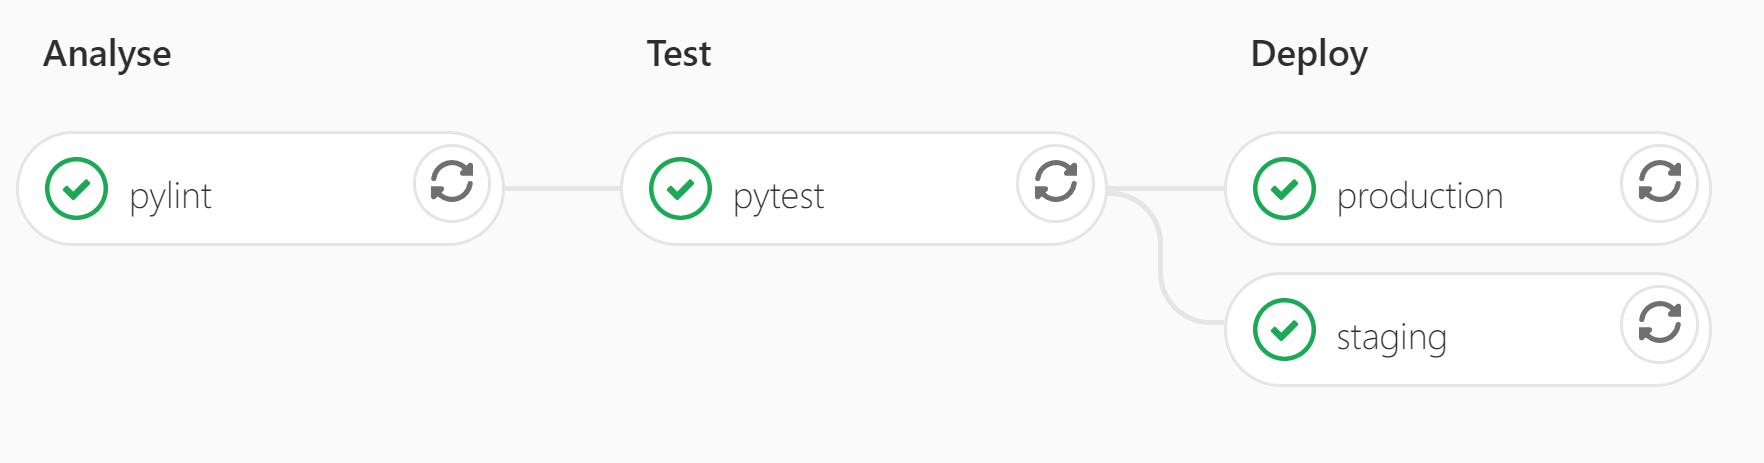
Additionally, the .gitlab-ci.yml configuration file which specifies what to automate is usually also version-controlled, so that if the CI pipeline evolves, it evolves alongside the relevant version of your code.
Why it’s useful
All manner of tasks can be automated using CI, and can allow you to catch errors early and fix them before they propagate technical debt in the codebase.
Common tasks for larger Python projects might be to test our code for compatibility with different Python versions, build a Python module as a wheel, and/or push it to PyPi. For projects using compiled languages, you could automatically build your binaries for all your target platforms. For web development, it’s easy to see the benefit of automatically deploying new code on a server once certain conditions have been met.
Furthermore, part of the reason that CI is so powerful is its close relation to version control. Every time that code is pushed to any branch in a repository, tests and analysis can run, which means that people who control master or protected branches can easily see if code is safe to merge in.
Indeed, whilst CI is most satisfying when the pipeline is full of ticks, it is most useful when it looks like this:
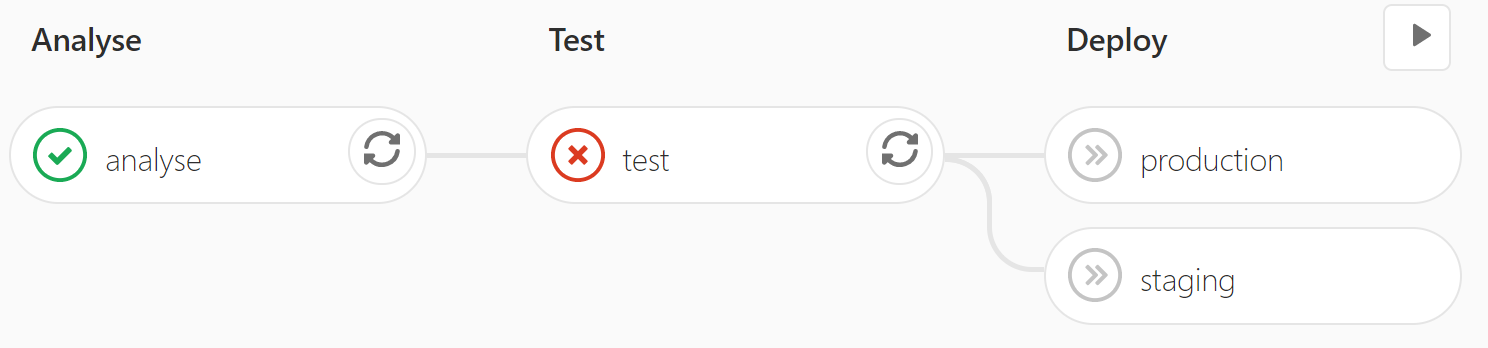
This means that the tests failed, and as a result, the broken code was not deployed. People can clearly see not to merge this code into important branches.
Conclusions: do you need CI?
CI/CD is definitely more useful in some cases than others. But if you’re writing any code at all, you can save yourself time by writing tests for it. And if you have tests, why not run them automatically on every commit?
I can personally say that every time I’ve set up a CI pipeline, not only has it saved me time, but at some point or another it got me out of a scrape by catching broken code. I’d wager it will do the same for you.
No comments:
Post a Comment