I’ve been using my Kinesis Advantage keyboard for two months, and I love it. I’ll never go back to a regular keyboard again if I can help it.
There are a few downsides to it, however. The biggest one is that split distance between the two sides is fixed. It doesn’t have Cherry MX blues (although the browns plus the firmware beeps is pretty nice). It doesn’t have layers, really — just a ten-key under the right hand. And honestly, it’s not very portable.
I took the Kinesis out to a coffee shop a few times before they all dried up into drive-thrus, and plunking it down on a four-top out in public made me realize just how large and loud it really is.
And so I’m building an ErgoDox keyboard. What I really want to build is a Dactyl — a curved variation on the ErgoDox — but I can’t just go whole-hog into that without building some type of keyboard first. That’s just my practical nature, I guess. I realize that the comparison is weak, because I’ll have to hand-wire the keyboard matrix when I make the dactyl. Assembling an ErgoDox is child’s play, comparatively. Our goal today is to lay out just what I’m getting myself into with a build like this one.
You can buy ErgoDox kits, but I like to go about things in my own weird way, and to better get my head around this, I wanted to figure out what all the pieces are instead of having the information handed to me. You can also buy these keyboards already put together, but what’s the fun in that? This way, I can save next to no money at all, and do all the labor myself!
I’m trying to take everything into consideration as I do this, which of course includes making it look as cool as possible. I went with a clear acrylic case because transparent electronics are truly the best type of electronics.
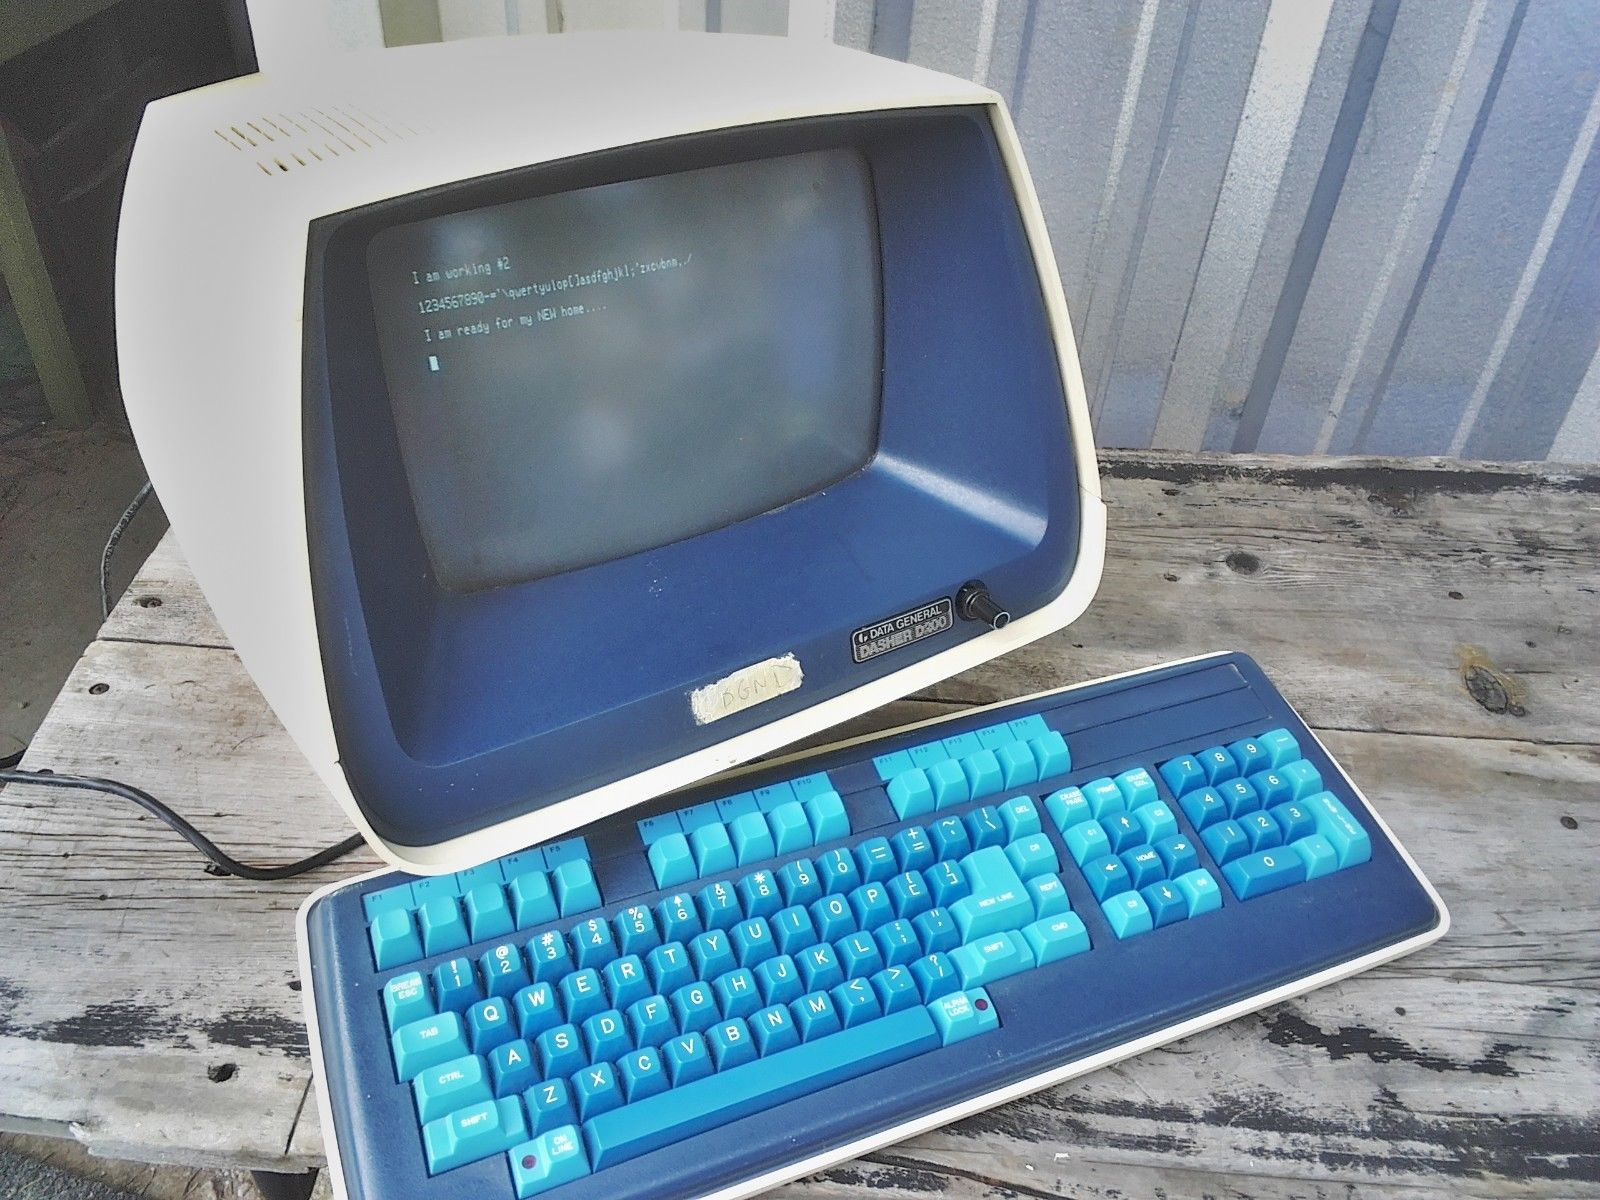
The first major aesthetic decision was sealed when I ordered PCBs with blue solder mask. So keeping in mind that the boards will show through the case, I’m going with a dual or maybe triple blue colorway on the keycaps — something like the keyboard on the Data General Dasher terminal.
Parts and Labor
So what are all the parts? The most fun ones to think about are the case options, the key caps, the switches, and the cables — one mini-USB to connect to the computer, and one TRRS audio cable so the two halves can talk to each other. But all that stuff is just icing on the cake. Before we bust out the pastry bags, let’s crack a couple of eggs here.
PCBs
The ErgoDox can have between 76 and 80 keys, and the difference is in the thumb clusters. You can either have eight regular-sized keys, or four regular and two doubles like the Kinesis.
There’s one left and one right PCB, but the design is interchangeable, meaning you need two of the same PCB. You can buy sets of them already made, or grab the gerbers and have ’em fabbed. I went with the second option. I really wanted purple PCBs, but the board is big and complicated enough that it just wasn’t going to be cost effective, so I tried a new board house.
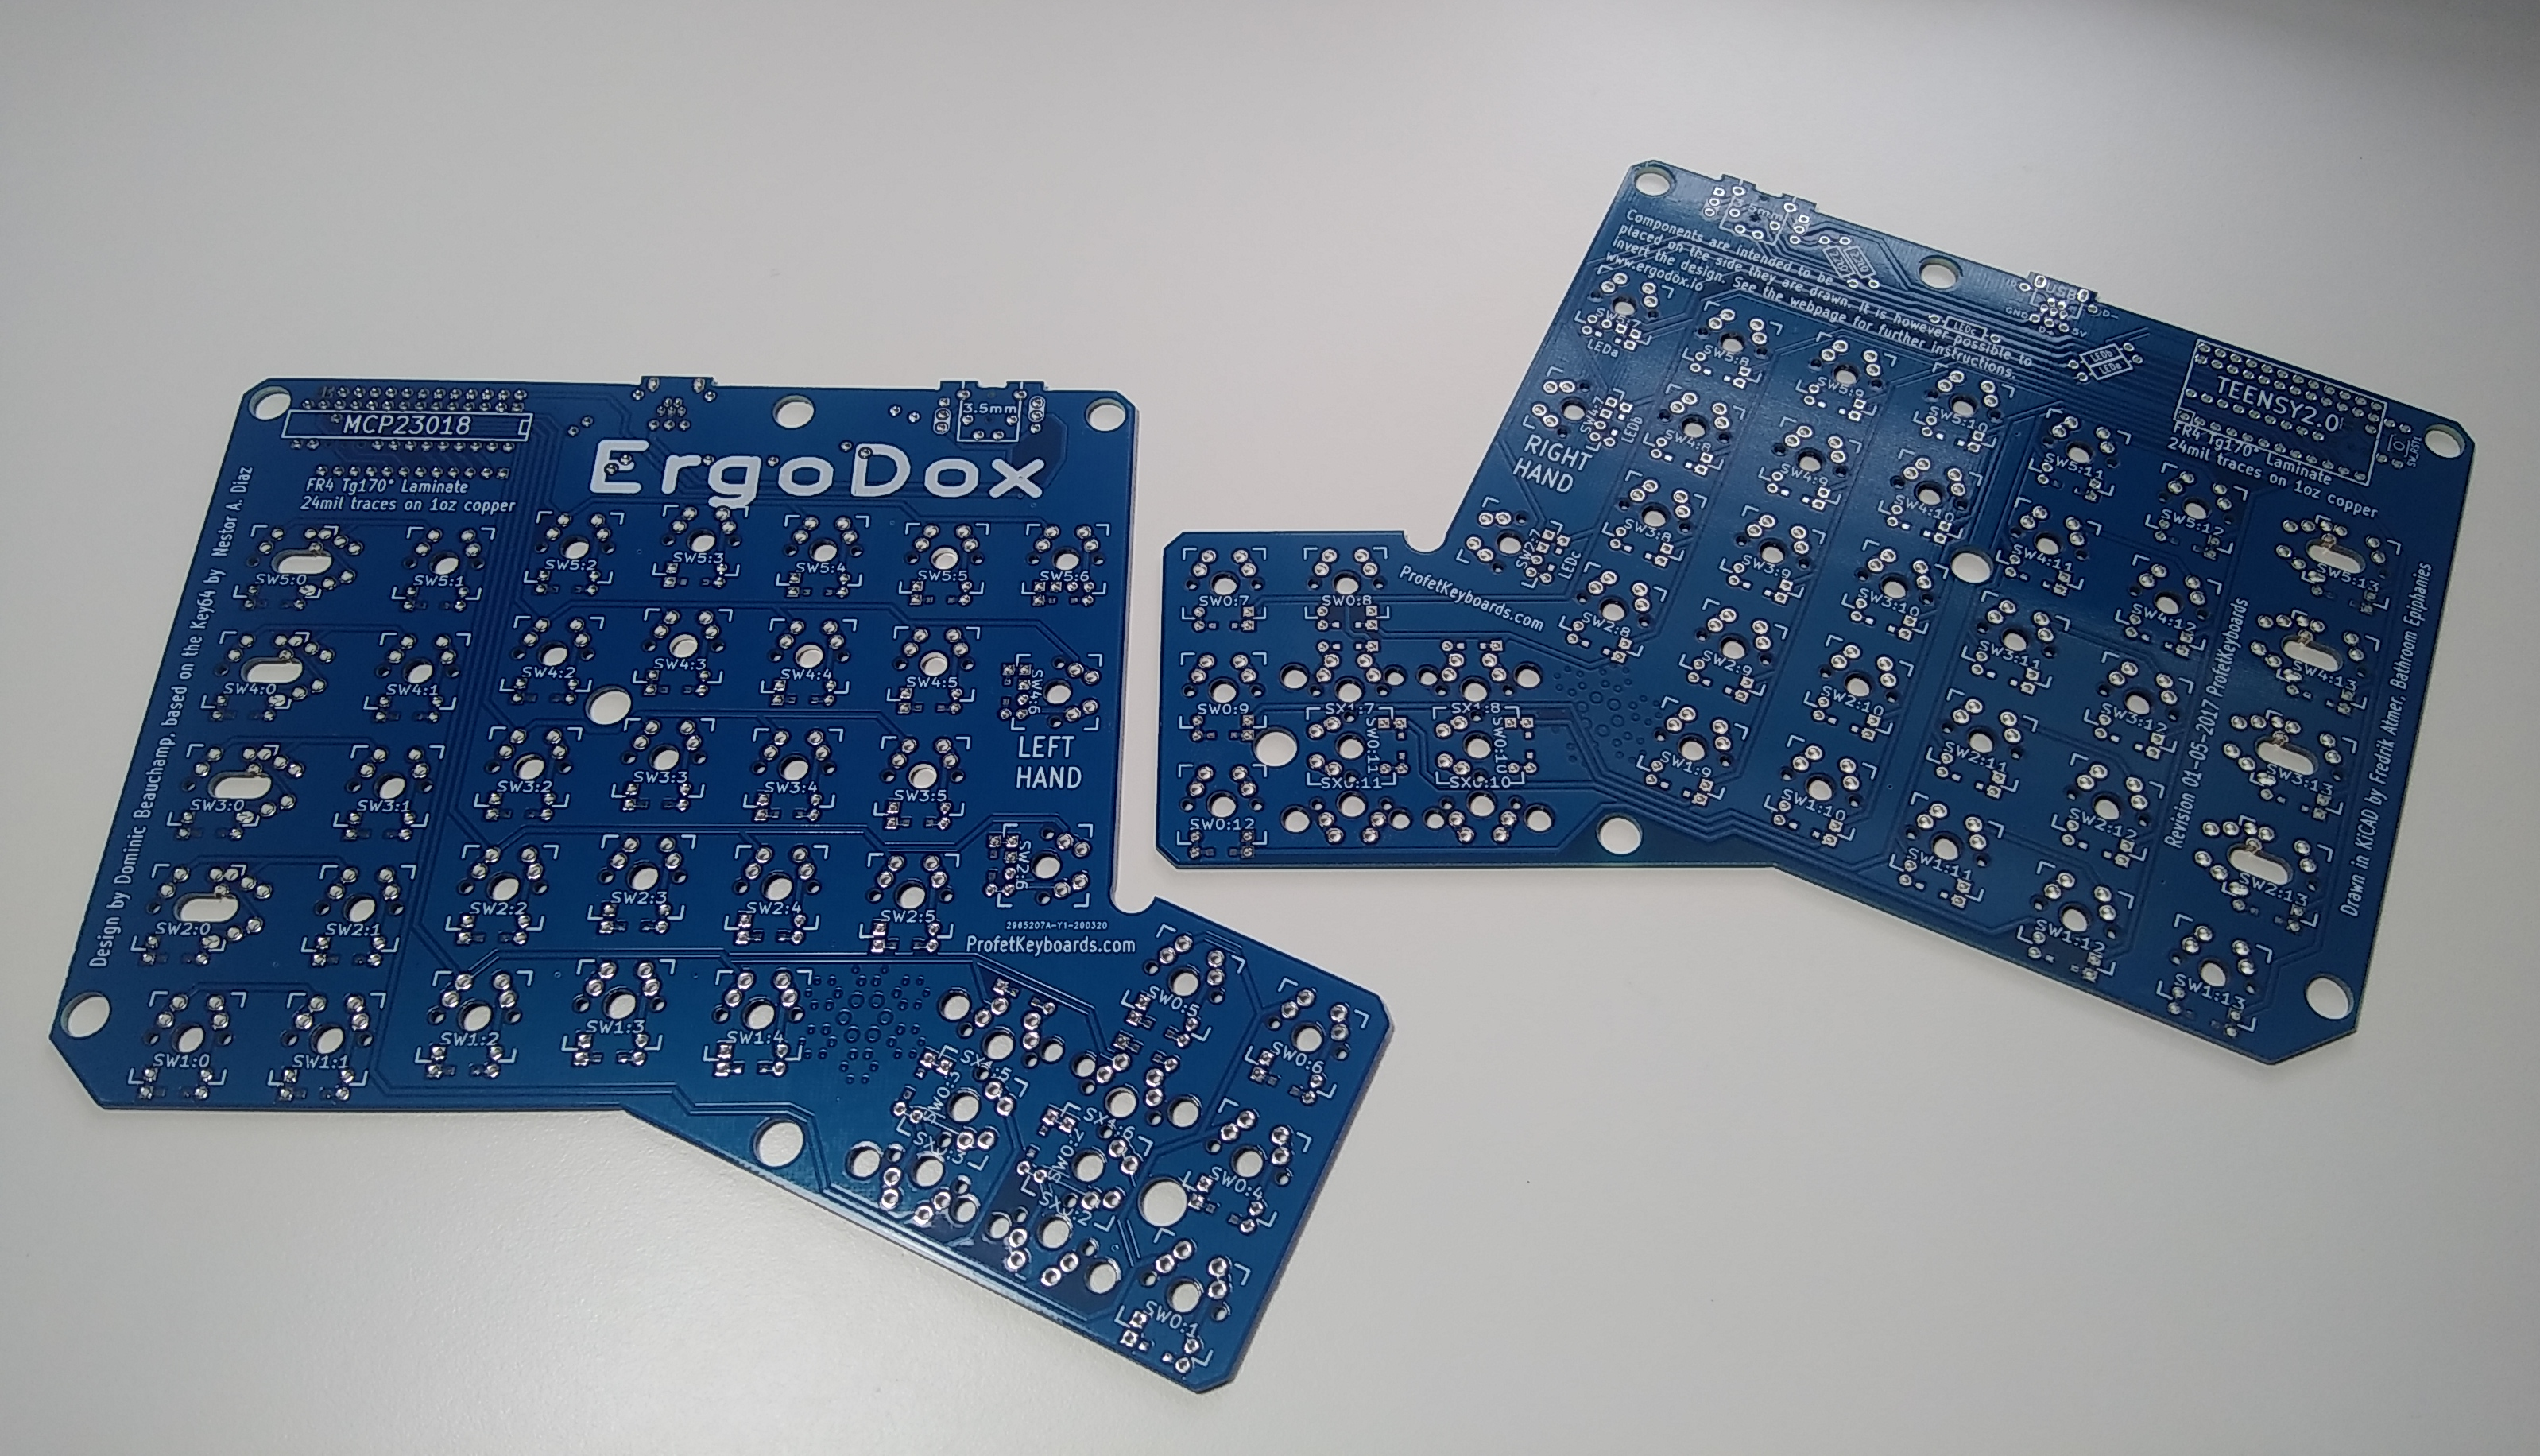
I could have ordered PCBs from the same place where I got the case parts and all the electronic components, minus the switches. But I thought it would be nice to have backup boards in case I screw something up royally. For some reason, I thought I would be getting five sets, because it showed two boards when I uploaded the zip file. Nope. Got five boards, as in 2.5 keyboards’ worth. But I’m pretty sure that a single board can be used by itself if you solder the Teensy to one side and the I/O expander on the other. If so, look out for a post about a massive mono-manual Maltron-esque macro matrix. Mmm.
Controller and Components
The ErgoDox is designed to be controlled with a Teensy 2.0 running open-source firmware like QMK. I’m not sure if a higher-caliber Teensy will work or not. I bought a set of components that included the Teensy — it felt like it was cheaper than sourcing everything individually. Each of the 76 key switches gets a 1N4148 diode, and the ErgoDox PCBs are designed to allow for either through-hole or SMT diodes.
Since the Teensy has nowhere near 76 I/O pins, the keyboard uses an I/O expansion chip to set up a matrix of rows and columns. Rounding out the components are a handful of passives, a TRRS jack for each half, a mini-USB jack, and three LEDs that let you know which keyboard layer you’re operating in.
Case and Cables
Besides being fun, the case actually makes a difference in keyboard design and construction. This keyboard is designed to have plate-mounted key switches, which means there is a layer with 76 key switch-shaped holes in it between the switches and the PCBs. This adds stability to the switches and reduces stress on the solder connections. You can find the files to cut or print your own case layers, and plenty of people out there will sell you pre-made case pieces.
 I love me some see-through electronics, so my case is five layers of transparent acrylic — top, bottom, key switch plate in the middle, and two spacer plates between those. The only thing I regret is not going in and changing the ErgoDox logo to literally anything but Comic Sans, cause it’s gonna show through.
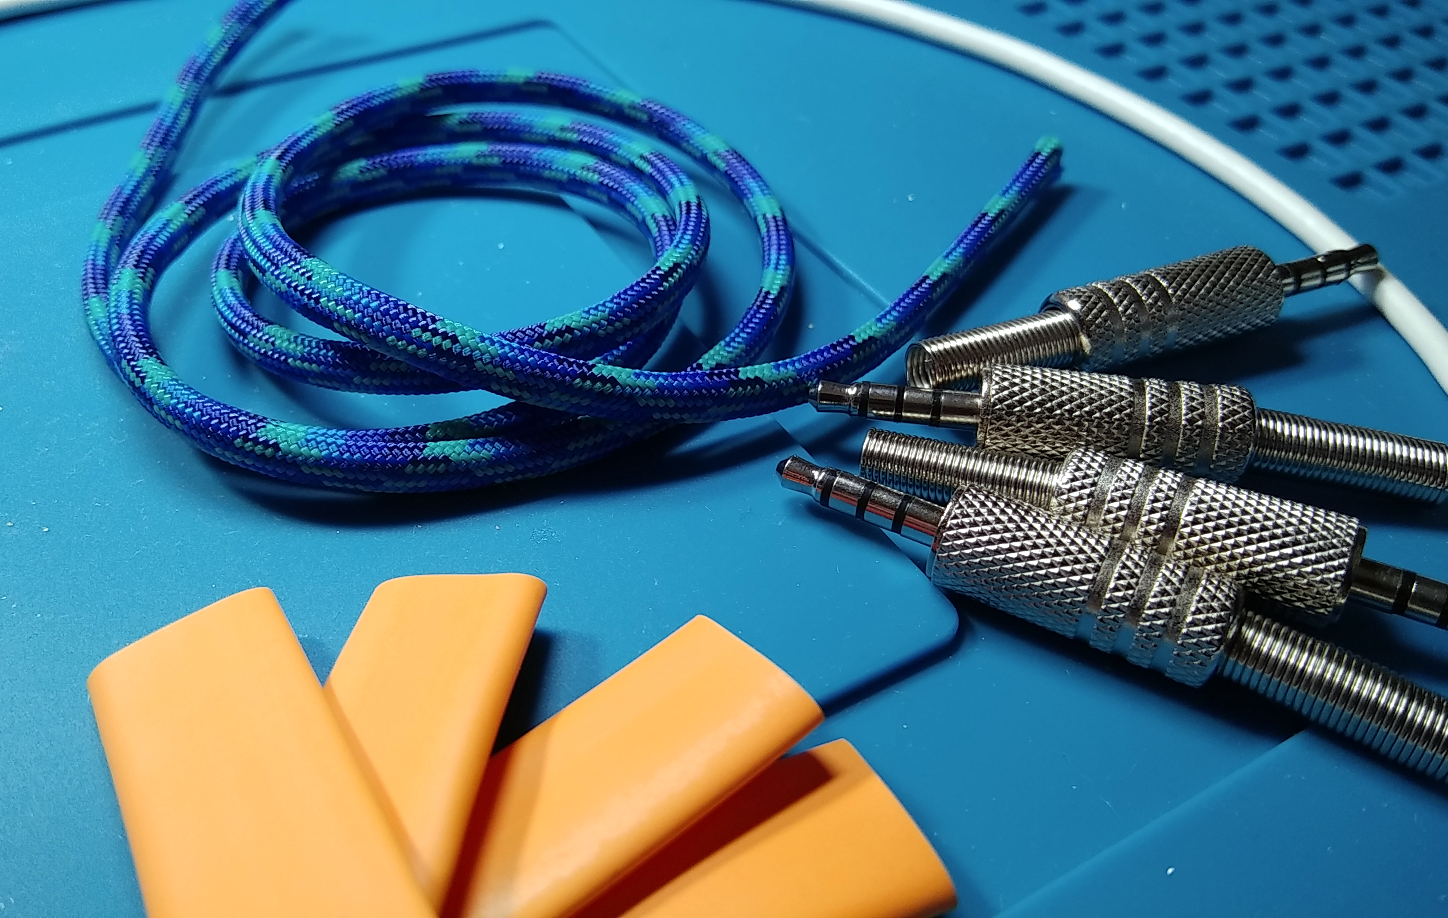
Like I said, you need a TRRS cable and a mini-USB. If you buy the components piecemeal, you’ll need a second sacrificial mini-USB to extend the Teensy connection out to the edge of the board. I bought a set of components that included a DIY mini-USB connector that only needs wires and assembly.
It’s sort of traditional to have a sexy TRRS cable with a paracord sleeve and a matching USB cable to go with it. Pre-made cables aren’t cheap, but making your own is quite affordable. I’m holding off on ordering the USB until I see how this paracord looks with the blue of the PCBs and the sample color chips I ordered from a keycap manufacturer.
The Sound of Silence Switches!
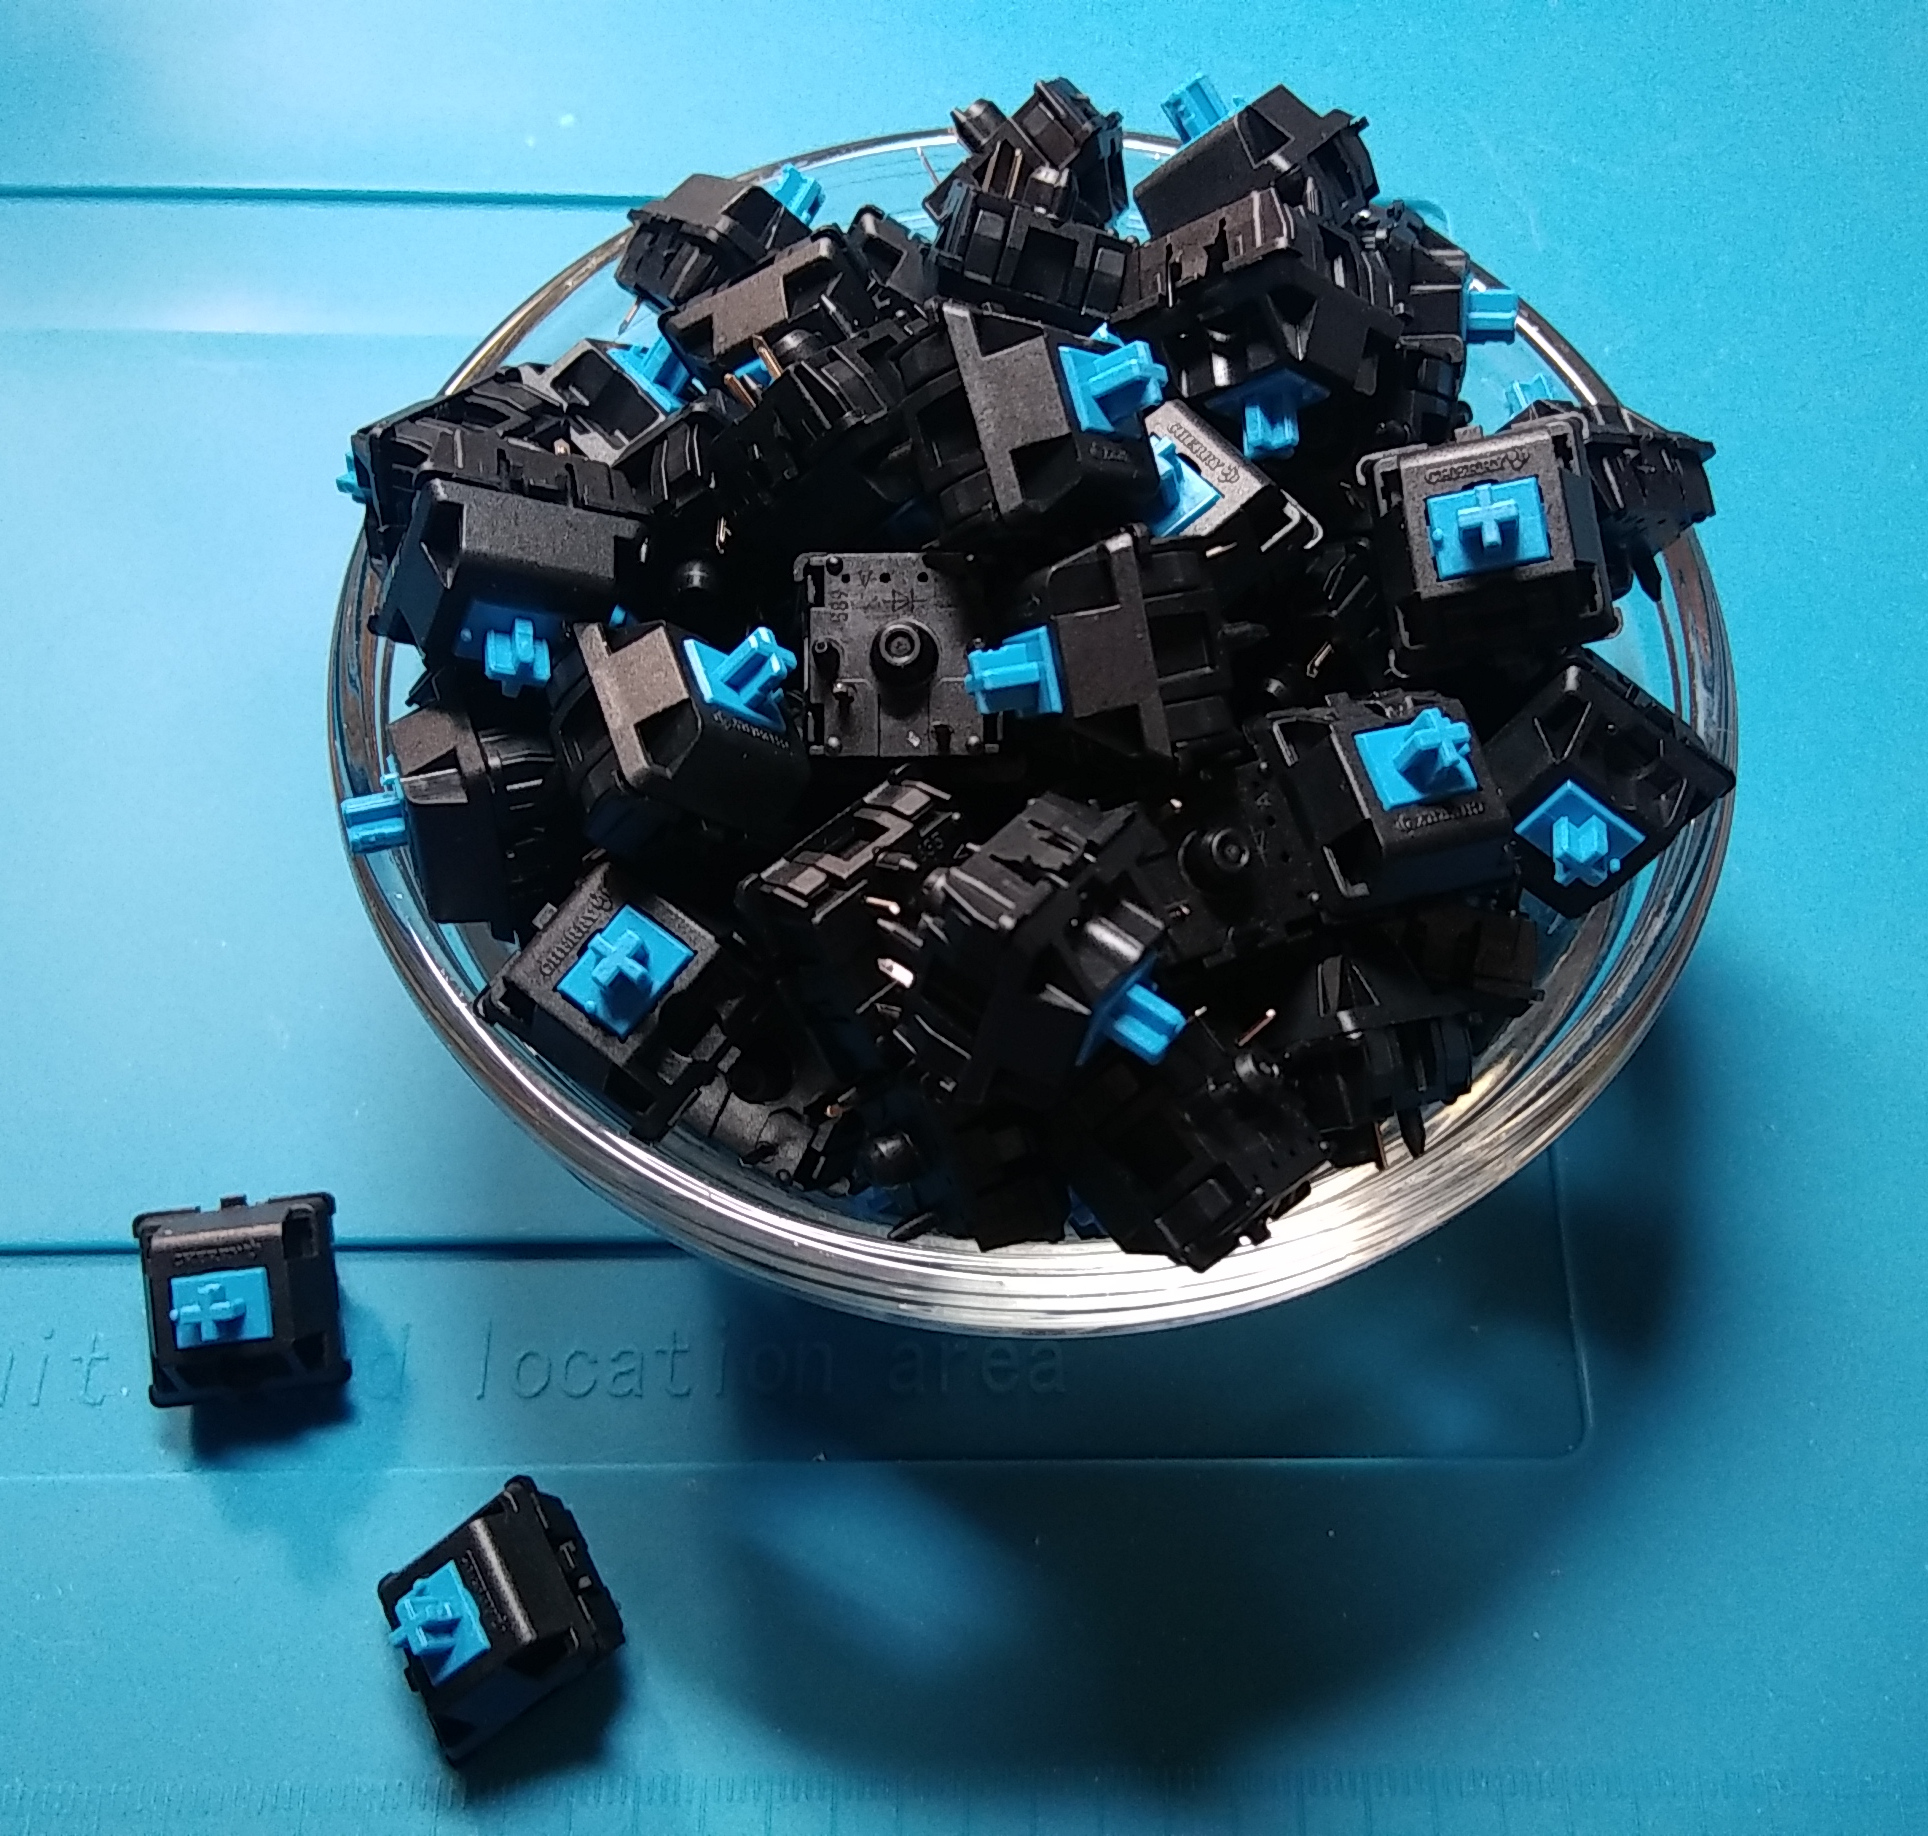
Cover your ears — the switches are going to be Cherry MX Blues. Blues are loud, but it’s okay, because I’ve been working from home since before it was mandatory. I thought about getting Browns because that’s what the Kinesis has and I’ve grown to like them, but blues are so delightfully crisp and clacky.
Browns are tactile instead of clicky, and they take about five or so fewer grams of actuation force, which is good for anti RSI purposes. But since I won’t be using this keyboard for super long periods of time, I think blues will probably be okay.
For a minute, I thought about putting browns in all the pinky and ring finger slots, and blues everywhere else, but I’m kind of afraid the keyboard will sound weird and throw off my typing momentum. But like I said, the idea to build the ErgoDox and subsequently the Dactyl is to have a portable split ergo keyboard to take out to coffee shops instead of the giant Kinesis, should I get the opportunity to do that again in this lifetime. Part of the reason the Kinesis is loud is because of her cavernous, echoing case. If the ErgoDox ends up being loud enough to bother people, I can always put little sound-dampening o-rings on the stems of the keycaps.

Keycaps
And now we have come to the best, most fun part of the build. It’s also the most nerve-wracking to decide upon, but that’s okay, because keycaps are easy to change. They’re like little outfits for your keeb, or hats if you prefer. Keyboard Layout Editor is a great tool for trying things on.
As fun as they are to look at, the ‘caps are also a functional part of the build. The material and the style can make or break a keyboard’s utility, depending on what you want to do with it.
Fantastic Plastic
Material-wise, there are two major options: ABS and polybutylene terephthalate (PBT). I don’t have to tell you what ABS is — Dan Maloney does it better, anyway. PBT is thicker, higher quality plastic with a nice feel. It’s able withstand UV light without discoloring, and will resist developing a slimy sheen from finger oils for a lot longer than ABS.
The sides of PBT keycaps are smooth, but the tops have a pleasant rough feel to them. The worst thing about PBT keycaps are that they come in far fewer colors than ABS. I don’t know exactly what keycaps the ErgoDox will have yet, but they will probably be blank PBT in shades of blue and maybe purple.
Stylin’ and Profilin’
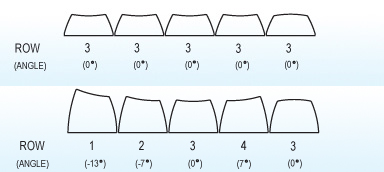
The other difficult thing about choosing keycaps is deciding on a keycap profile — this refers to the way the keys are shaped and the tops are sculpted (or not sculpted). If you look at most standard, non-chiclet keyboards from the short side, you’ll see that the tops of the keys are shaped differently from row to row.
To reduce finger travel distance, the profile of upper rows like the F keys and number keys usually tilt downward, the ZXCVB row tilts upward, and the spacebar row is convex. The home row, which is row 3, is the flattest, though not all families have a flat row 3.
I love the look of SA profile caps, but they are super tall and might fatigue my stubby fingers. I’m leaning towards DSA because I bought some with homing bumps for the Kinesis, and I like how shallow they are. As long as I get all row 3s, they’ll be uniformly profiled and should be an easy transition back to a flat keyboard. DSAs key caps are also a good option for the Kinesis, so if they don’t work out on the ErgoDox, then they have a place to go.
This can be a real money pit of a hobby, a hobby with a capital H if you will. I knew that going into this, and I went in just the same. Here’s hoping I only build keyboards I will use, and recycle the rest.
No comments:
Post a Comment