Sunday, September 2
Epoxy Embedded Electronic Art Running On Pyramid Power
We sometimes get our inspirations from art. When [kodera2t] saw some Japanese art of fish drawings embedded in clear epoxy he just had to make his own. But while skilled in electronics, he wasn’t skilled at drawing. We’d still call him an artist, though, after seeing what he came up with in his electronics embedded in crystal clear epoxy.
 His first works of electronic art were a couple of transistors and some ICs, including an 80386, encased in epoxy. But then he realized that he wanted the electronics to do something interesting. However, once encased in epoxy, how do you keep the electronics powered forever?
He tried a solar cell charging a battery which then powered an LED but he didn’t like the idea of chemical batteries encased in epoxy for a long time.
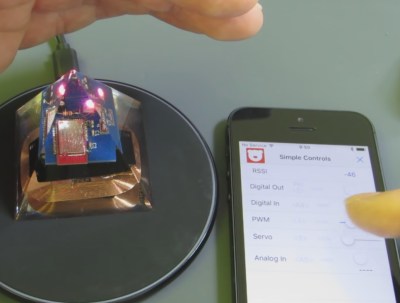
He then switched to wireless power transmission with a receiving coil in the base of epoxy pyramids. For one of them, the coil powers a BLE board with an attached LED which he can control from his phone. And his latest contains an ESP32-PICO with an OLED display. The code allows him to upload new firmware over the air but on his Hackaday.io page, he shows the difference between code which can brick the ESP32 versus code which won’t. But don’t take our word for it. Check out the video below to see his artistry for yourself.
While embedding electronics in epoxy is new to [kodera2t], we’ve seen it a few times before. once in the form of an amplifier circuit done beautifully, dead bug style, and a more experimental attempt with a solar lantern.
Transistor Fundamentals Animated
When we were in school, every description of how transistors work was pretty dry and had a lot of math involved. We suppose you might have had a great instructor who was able to explain things more intuitively, but that was luck of the draw and statistically unlikely. These days, there are so many great videos on the Internet that explain things that even if you know the subject matter, it is fun to watch and see some of the great animations. For example [Sabin] has this beautifully animated explanation of how MOSFETs work that you can see below.
It uses the same basic graphics and style as his earlier video on bipolar transistors (second video, below) which is a great one to watch, too. In all fairness to your electronics teacher, the kind of graphics in these videos would have cost a fortune to do back in the 20th century — just watch some of the videos we talk about in some of our historical posts.
Even if you are well versed in device physics, these videos are great if you want some help explaining electron and hole motion through semiconductors. One thing we were pleased to see is the smiley-faced electrons don’t frown when they are doped like on the bipolar transistor. We hate to think of our friendly electrons being unhappy.
In today’s world, you can get by without knowing how devices work. After all, a Raspberry Pi works great without knowing what’s happening at this level. Of course, you can drive a car without understanding the engine, but you can bet every driver at the Indy 500 knows exactly how the engine works.
If you want a more hands-on look at using FETs, we did that. Once you understand what’s really happening at the electron level, it makes reading about semiconductor advances more interesting.
LED-ifying A Guitar
Say you have a guitar, an expensive guitar – one of only three like it. And say this guitar sounds great, but it’s missing something. It needs something, but something that won’t ruin the finish. Over at Sparkfun, [Englandsaurus] was asked to come up with a really cool looking mod to a three-of-a-kind guitar – covering the body with LED strips to create light patterns on the guitar.
In order not to damage or modify the guitar [Englandsaurus] sandwiched the body between two plexiglass sheets, connected together by 3D printed clips. The clips have a dual purpose – they hold the plexiglass pieces to the guitar and also act as conduits for a pair of fiber optic tubes that run around the edge of the body. In order that the color goes all the way around the guitar’s edge without a break in the light, the fiber optic cables are offset. At each clip light is fed into them. One cable runs between two clips, skipping one in between, and the second cable runs between the skipped clips. This allows light to flow around the guitar’s body.
At nearly 500W at full-white, these LEDs draw a lot of power, however, at full brightness they’re overpoweringly bright, so [Englandsaurus] used some WonderFlex, a moldable, diffuse plastic sheet, to cover them. Even with this, the LEDs aren’t run at full brightness. The fiber optic cables, though, need full brightness due to their covering.
Around 1600 LEDs went in to this mod and the guitar itself hasn’t been modified. Everything is removable, and the guitar would go back to its original self if the strips were taken off. Take a look at Strumbot, another project where the original guitar wasn’t modified, or a really cool scrap metal guitar.
A BCD Clock For Your Desk
We see so many clocks here at Hackaday, and among those we see our fair share of binary clocks. But to see one that at first sight looks as though it might be a commercial product when it is in fact a one-off project is something special. That’s just what [Tobi4sDE] has done though, with his desktop BCD binary LED clock.
The front panel is a black PCB on which sit the LEDs that form the binary display, and its back holds an ATMega328P microcontroller and DS3231 real-time clock. A smart desktop case is 3D-printed, and while the clock is USB-powered it features a CR2032 coin cell as a backup to hold the time while the USB is disconnected.
Unexpectedly he’s used a mini USB socket rather than the expected micro USB, but the rest of the clock is one we’d probably all have on our desks given the chance. We’d even go so far as to say we’d have this one as a kit if it were available.
Of course, regular readers will notice that this isn’t the only high-standard BCD timepiece you’ll have seen recently, though the other one was a wristwatch.
Weekend Watch: Game Crafting with DM Insomnia
 Learn basic game crafting with a dungeon master crafter.
The post Weekend Watch: Game Crafting with DM Insomnia appeared first on Make: DIY Projects and Ideas for Makers.
Talk To The Faucet
Your hands are filthy from working on your latest project and you need to run the water to wash them. But you don’t want to get the taps filthy too. Wouldn’t it be nice if you could just tell them to turn on hot, or cold? Or if the water’s too cold, you could tell them to make it warmer. [Vije Miller] did just that, he added servo motors to his kitchen tap and enlisted an AI to interpret his voice commands.
Look closely at the photo and you can guess that he started with a single-lever type of tap, the kind which can be worked with an elbow, so this project was probably just for fun and judging by his video below, he does have a sense of humor. But the idea is practical for dual taps with rotating knobs. He did realize, however, that in future versions he should move the servo motor openings from the top plate to the bottom instead, to avoid any water getting in. A NodeMCU ESP8266 ESP-12E board serves for communicating with the speech recognition side but other than the name, JacobAI, he’s keeping the speech part to himself. We secretly suspect that he has a friend named Jacob.
However, we can think of a number of options for it such as DeepSpeech and Wit.ai which we covered when talking about natural language phone bots, and the ubiquitous Alexa as used here with another NodeMCU for turning on Christmas tree lights.