Thursday, January 31
K40 Gets A Leg Up With Open Source Z Table
If you’ve done even the most cursory research into buying a laser cutter, you’ve certainly heard of the K40. Usually selling for around $400 USD online, the K40 is not so much a single machine as a class of very similar 40 watt CO2 lasers from various Chinese manufacturers. As you might expect, it takes considerable corner cutting to drive the cost down that low, but the K40 is still arguably the most cost-effective way to get a “real” laser cutter into your shop. If you’re willing to do some modifications on the thing, even better.
 One of the shortcomings of the K40 is that it lacks a Z axis, and with thick material that needs multiple cuts at increasingly deeper depths, this can be a hassle. [Aaron Peterson] decided to take it upon himself to design and build an adjustable Z table for the K40 at his local makerspace (River City Labs), and being the swell guy that he is, has made it available under an open source license so the rest of the K40-owning world can benefit from his work.
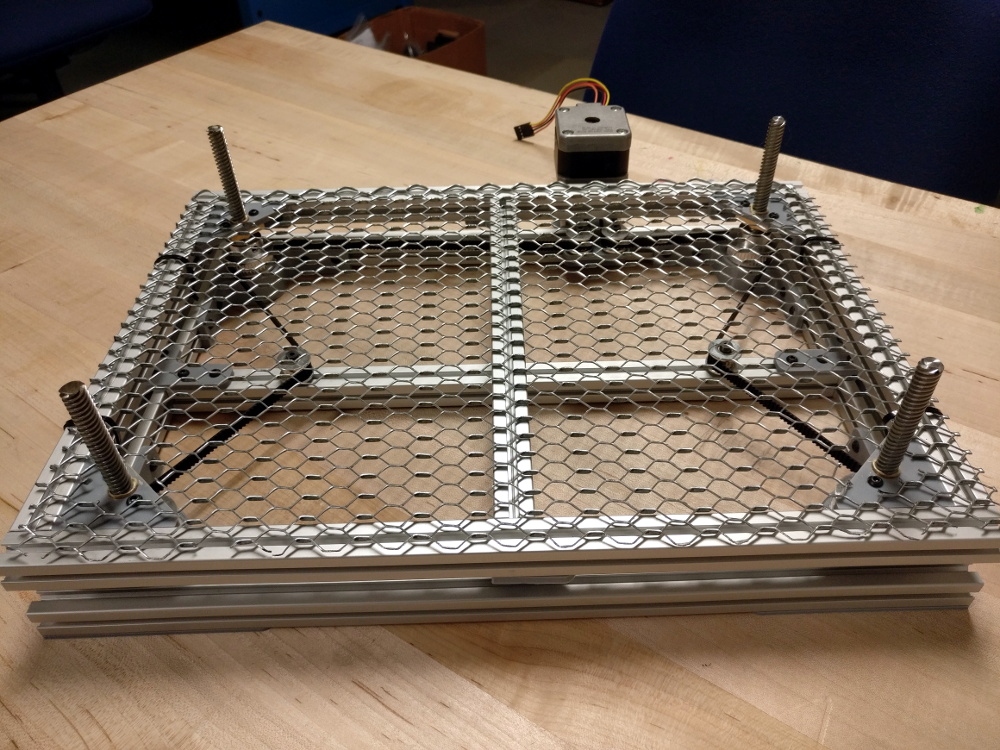
[Aaron] started the design with a number of goals which really helped elevate the project from a one-off hack to a sustainable community project. For one, he only wanted to use easily available commodity hardware to keep the cost down. The most complex components should all be 3D printable so the design would be easy to replicate by others, and finally, he wanted the user to have the ability to scale it in all dimensions. The end result is a electronically controlled lifting platform that anyone can build, for any laser cutter. It doesn’t even have to be limited to laser cutters; if you have a need for precisely raising or lowering something, this design might be exactly what you’re looking for.
The table is primarily constructed out of 15×15 aluminum extrusion, and uses standard hardware store expanded wire mesh as a top surface. Height is adjusted by rotating the four 95 mm T8 leadscrews with a GT2 belt and pulleys, which prevents any corner from getting out of sync with the others. Connected to a standard NEMA 17 stepper motor, this arrangement should easily be capable of sub-millimeter accuracy. It looks as though [Aaron] has left controlling the stepper motor as an exercise for the reader, but an Arduino with a CNC shield would likely be the easiest route.
We’ve seen a lot of hacking around the K40 over the last couple of years, from spring loaded beds to complete rebuilds which are hardly recognizable. If you’re looking for a cheap laser with a huge catalog of possible hacks and modifications, you could do a lot worse than starting with this inexpensive Chinese machine.
Down the Rabbit Hole of Electronics Manufacturing
If you want to build hundreds of a thing (and let’s face it, you do) now is a magical time to do it. Scale manufacturing has never been more accessible to the hardware hacker, but that doesn’t mean it’s turn-key with no question marks along the way. The path is there, but it’s not well marked and is only now becoming well-traveled. The great news is that yes, you can get hundreds of a thing manufactured, and Kerry Scharfglass proves that it’s a viable process for the lone-wolf electronics designer. He’s shared tips and tricks of the manufacturing process in a prefect level of detail during his talk at the 2018 Hackaday Superconference.
Kerry is the person behind the Dragonfly badge that was sold at DEF CON over the last two years. Yes, this is #badgelife, but it’s also a mechanism for him to test the waters for launching his own medium-run electronics business. And let’s face it, badge making can be a business. Kerry treats it as such in his talk.
After creating 100 badges for DC25 back in 2017 he set a goal in 2018 to bump that number to 500, to use an overseas assembly house to take the process off of his kitchen table, and to come in with a sales price that was 3x the cost of goods sold. He achieved all of this and learn an amazing amount in the process.
This talk is a masterclass in judging tradeoffs during the design process. With 48 RGB LEDs on each of the 500 badges, Kerry was planning to source 25,000 LEDs. With that multiplier, price matters… a lot! He walks through his process which involved surveying available parts to select the most common footprint and pin alignment to ensure he had options if one supplier flaked on him. Speaking of that, he discusses “hedging” on the parts order by ordering in advance to make sure the world supply of a part isn’t yanked out from under you. At these scales, that is certainly a concern.
![]() Also interesting is his cost-benefit analysis of a few different aspects of the project. After spending 20+ hours on PCB routing he moved from a 4-layer to a 6-layer board. That added $130 to the total cost of the project, but it saved him hours he spent on LED animations instead. The customer cares about those animations, not about the number of layers. He also discusses 2-sided assembly at this scale. For one board, it would have cost an additional $58, but at 500 it’s just $0.10 per unit (that’s $50 more for the entire run of $500). Making this choice means easier layout and the ability to make a more artistically governed front face of the badge.
Also interesting is his cost-benefit analysis of a few different aspects of the project. After spending 20+ hours on PCB routing he moved from a 4-layer to a 6-layer board. That added $130 to the total cost of the project, but it saved him hours he spent on LED animations instead. The customer cares about those animations, not about the number of layers. He also discusses 2-sided assembly at this scale. For one board, it would have cost an additional $58, but at 500 it’s just $0.10 per unit (that’s $50 more for the entire run of $500). Making this choice means easier layout and the ability to make a more artistically governed front face of the badge.
Watch the video, it’s a wealth of knowledge, then come back here and leave a comment thanking Kerry for putting so much care into sharing the story of this product cycle. When we talk about Supercon being the Ultimate Hardware Con, these are the kinds of talks that get us there!
In total, Kerry put about 460 hours of work into producing 460 working Sympetrum-v3 badges. He registered about $14,000 of profit which works out to around $30 per hour for his labor. What I’m still stuck on is the time sync of about 10.25 full-time work weeks. Now that’s #badgelife.
Putting Switch’s 32 million shipments in context
-

Fig. 1: The Switch isn't quite matching the Wii's record-setting sales pace, but it is outpacing most other consoles at this point in their cycles.
With two full holiday seasons of public sales data now under its belt, the Nintendo Switch continues to help right a company balance sheet that was nearly decimated by the Wii U. Last night, Nintendo reported 9.41 million Switch shipments in the holiday 2018 quarter, contributing to 32.27 million console shipped worldwide since the system's March 2017 launch.
Those numbers sure sound big, but they can be hard to judge in the abstract. So, as we have done in the past, we decided to provide some quick comparisons that put the Switch's continued success into the proper context. Use these numbers to calibrate your impression of how well Nintendo's new system is really doing and to adjust your projections of how it may do going forward (as Nintendo has).
(Lifetime sales measure slightly different calendar periods due to staggered release dates through the year, but all include two holiday seasons. Monthly periods rounded up for partial launch months).
Read 10 remaining paragraphs | Comments


Linux Fu: Easier File Watching
In an earlier installment of Linux Fu, I mentioned how you can use inotifywait to efficiently watch for file system changes. The comments had a lot of alternative ways to do the same job, which is great. But there was one very easy-to-use tool that didn’t show up, so I wanted to talk about it. That tool is entr. It isn’t as versatile, but it is easy to use and covers a lot of common use cases where you want some action to occur when a file changes.
The program is dead simple. It reads a list of file names on its standard input. It will then run a command and repeat it any time the input files change. There are a handful of options we’ll talk about in a bit, but it is really that simple. For example, try this after you install entr with your package manager.
- Open two shell windows
- In one window, open your favorite editor to create an empty file named /tmp/foo and save it
- In the second window issue the command:
echo "/tmp/foo" | entr wc /tmp/foo - Back in the first window (or your GUI editor) make some changes to the file and save it while observing the second window
If you can’t find entr, you can download it from the website.
Frequently, you’ll feed the output from find or a similar command to entr.
What It Isn’t
I had mentioned incron before as a way to attach actions to file changes. It also makes things easier, although perhaps not as easy as entr. As the name suggests, incron does for filesystem changes what cron does for time. That is, it causes some action to occur any time the specified file system changes happen. That survives a reboot or anything else short of you canceling it. This is very different from entr. With entr, the command runs like a normal application. As long as it is running, changes in the target files will trigger the specified action. When you stop the program, that’s the end of it. Usually, you’ll stop with a Control+C or a “q” character.
Speaking of the keyboard, you can also press space to trigger the action manually, as though a file changed. So, unlike incron, entr is an interactive tool. You’ll want it running in the foreground.
Options
There are several command line options:
- -c – Clear screen before executing command
- -d – Track directories that do not start with “.”
- -p – Do not execute the command until an event occurs
- -r – Kill previously run command before executing command
- -s – Use shell on first argument
The /_ placeholder gets the name of the first file that caused a trigger, although that doesn’t seem to work properly with -s. For example:
find /tmp/t/data -name '*.txt' | entr cp /_ /tmp/archive
When one of the .txt files changes, it will copy to /tmp/archive.
The -d option has a peculiarity. With it you can use a directory name or a file name and the program will watch that directory along with any files. The file changes behave as normal. However, any new files in the directory will cause entr to stop. This lets you write things in a loop like this:
while true; do
  ls -d src/*.[ch] | entr -d make
done
The loop ensures that entr is always looking at the right list of files. This will also cause an error exit if you delete one of the files. The ls command provides all the .c and .h files in the src directory. The command is smart enough to infer the directory, so you don’t need to set it explicitly.
Missing Changes
The -r option is good if you are running a program that persists — for example, you might use kdiff3 to show the differences between a recently changed file and an original copy. This option causes entr to kill the program before starting a new one. Without this flag, it is possible, too, for entr to miss a file change. For example, make a file called foo and try this:
echo foo | entr -ps 'echo change; sleep 20'
In another shell, change foo. You’ll see the change message print on the original shell. If you wait 20 seconds you’ll see something like “bash returned exit code 0.” Now change foo again, but before you see the bash message, change it again. Once the 20 second timer expires, entr will go back to waiting and the new change will not cause a trigger!
Exit entr and start it again with the options -psr instead of -ps. Now do the same test again. You’ll see that the change registers and the original bash script never completes. However, if there are no changes for 20 seconds, the last script will exit normally.
Examples
There are plenty of examples in the tool’s man page. For example:
find src/ | entr -s 'make | head -n 20'
This gets a list of all files in the source tree (including subdirectories) and when any change, you run make. The head command only shows the top 20 lines of output.
A lot of editors make automatic backup of files, but if yours doesn’t it would be pretty simple to make an auto archive with entr, although, honestly, use git or something if you want real version control:
echo testfile.txt | entr -s 'AFN=/tmp/testfile-$(date).txt; cp testfile.txt "$AFN"; zip -j archive.zip "$AFN"'
This stores each version of testfile.txt in archive.zip along with a timestamp on the file name:

It was tempting to use /_ in this script, but it doesn’t seem to work with the -s option very well.
Embrace Change
I doubt I’ll use entr as much as I use incron. However, for little one-off projects, it is pretty handy and I could see making some use of in that case. However, as usual, for any given task there are usually many ways to accomplish it. Having entr in your toolbox can’t hurt.
There are still other ways. For example, last time, someone mentioned in the comments that systemd can take a “path unit” that can trigger when a file or directory appears or changes. This still uses inotify internally, so it is really just another wrapper. Still, if you like systemd, it is a consistent way to set up something similar to incron but under the tentacles of systemd.
Microsoft promises to make Windows setup error messages useful
Windows has a pretty poor reputation when it comes to error messages. All too often you'll get a meaningless hexadecimal number or perhaps a reference to a Knowledge Base article. The Windows setup process used for upgrading to each major Windows feature update is a good example of this; it detects and diagnoses a wide range of incompatibility issues prior to performing the installation but does very little to help Windows users actually resolve any of the problems that it finds, instead preferring to leave them with obscure codes.
The next major Windows release, the Windows 10 April 2019 Update (codenamed 19H1), is going to offer some significant improvements in this area. Microsoft described them on its Windows Insider webcast, and they were spotted initially by WinFuture. Currently, the best case during installation is something like this screen:
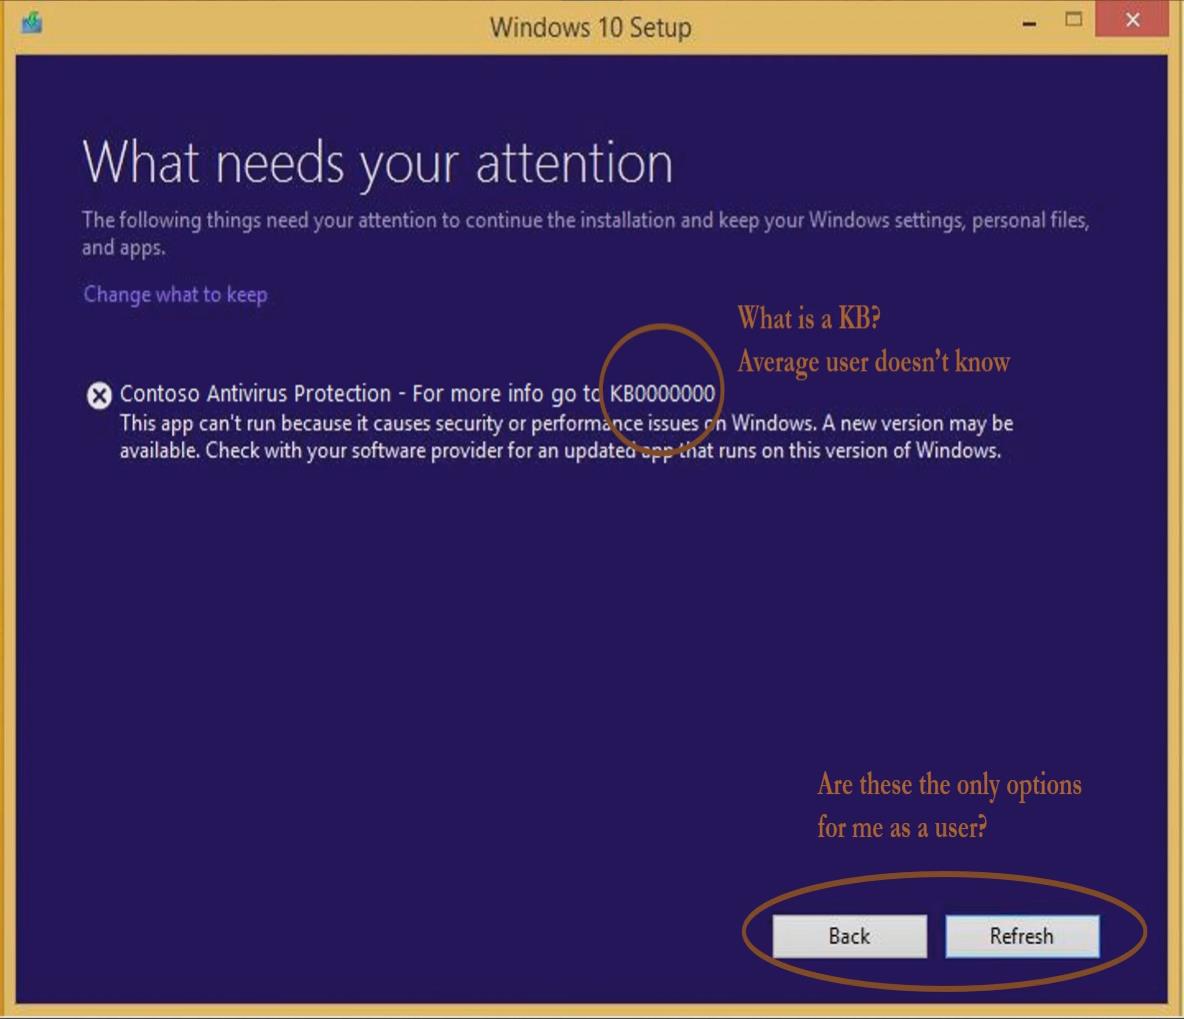
There's no clear description of the compatibility problem that's blocking the installation, and neither the back nor the refresh button is particularly useful. (credit: Microsoft)
The message says that an incompatible application is detected, and a Knowledge Base article is referenced. It turns out that most Windows users don't know what "KBxxxxxxx" actually means, and the article isn't hyperlinked to make accessing it any easier. Issues detected through the other setup experience aren't much better. Windows will offer to uninstall problem applications, but often the better solution is to upgrade the application in question.
Read 3 remaining paragraphs | Comments


3D Print That Charging Dock For Your 3DS
The Switch is the new hotness and everyone wants Nintendo’s new portable gaming rig nestled in a dock next to their TV, but what about Nintendo’s other portable gaming system? Yes, the New Nintendo 3DS can get a charging dock, and you can 3D print it with swappable plates that make it look like something straight out of the Nintendo store.
[Hobby Hoarder] created this charging dock for the New Nintendo 3DS as a 3D printing project, with the goal of having everything printable without supports, and able to be constructed without any special tools. Printing a box is easy enough, but the real trick is how to charge the 3DS without any special tools. For this, [Hobby Hoarder] turned to the small charging contacts on the side of the console. All you do is apply power and ground to these contacts, and the 3DS charges.
 Normally, adding contacts requires pogo pins or hilariously expensive connectors, but [Hobby Hoarder] has an interesting solution: just add some metal contacts constructed from LED leads or paper clips, and mount it on a spring-loaded slider. A regular ‘ol USB cable is scavenged, the wires stripped, and the red and black lines are attached to the spring-loaded slider.
There is a slight issue with the charging voltage in this setup; the 3DS charges at 4.6 Volts, and USB provides 5 Volts. If you want to keep everything within exacting specs, you could add an LDO linear regulator, but there might be issues with heat dissipation. You could use a buck converter, but at 0.4 Volts, you’re probably better off going with the ‘aaay yolo’ theory of engineering.
[Hobby Hoarder] produced a few great videos detailing this build, and one awesome video detailing how to print multicolored faceplates for this charging dock. It’s an excellent project, and a great example of what can be done with 3D printing and simple tools.
Start And Stop GCode: Commands To Make Your Printer Do Your Bidding
 3D printers communicate via a language called G-code, like all Computer Numerical Controlled (CNC) machines. This versatile language provides a set of human-readable commands for controlling each action that a 3D printer performs. Slicing software may be thought of as an interpreter for translating 3D models into a series of […]
The post Start And Stop GCode: Commands To Make Your Printer Do Your Bidding appeared first on Make: DIY Projects and Ideas for Makers.
Raspberry Pi Counts Down to the Last Bitcoin
Even though it might appear to be pretend Internet money, by design, there are a finite number of Bitcoins available. In the same way that the limited amount of gold on the planet and the effort required to extract it from the ground keeps prices high, the scarcity of Bitcoin is intended to make sure it remains valuable. As of right now, over 80% of all the Bitcoins that will ever exist have already been put into circulation. That sounds like a lot, but it’s expected to take another 100+ years to free up the remaining ones, so we’ve still got a way to go.
 Even though his device will probably no longer exist when the final Bitcoin hits the pool, [Jonty] has built a ticker that will count down as the final coins get mined from the digital ground. The countdown function is of course a bit tongue-in-cheek, but the gadget also shows slightly more pertinent information such as the current Bitcoin value, so you can always remember what a huge mistake it was not to invest while they were still worth pennies.
On the hardware side, this is a pretty simple project. The enclosure is laser cut 5 mm MDF, and it holds a Raspberry Pi 3, a MAX7219 32×8 LED dot matrix display, and a 10 mm white LED with accompanying resistor. The white LED is placed behind an acrylic diffuser to give the Bitcoin logo on the side of the display a soft pleasing glow when the device is powered up. There are no buttons or other controls on the ticker, once the software has been configured it just gets plugged in and away it goes.
As for the software, it takes the form of a Python script [Jonty] has created which uses Requests and Beautiful Soup to scrape the relevant data from bitcoinblockhalf.com. The script supports pulling any of the 19 variables listed on the site and displaying it on the LED matrix, which range from the truly nerdy stats like daily block generation to legitimately useful data points that anyone with some Bitcoin in their digital wallets might like to have ticking away on their desks.
The first decade of Bitcoin has been a pretty wild ride, not only monetarily, but in the wide array of hardware now involved in cryptocurrency mining and trading. From Bitcoin traffic lights to custom-made mining rigs that are today more useful as space heaters, it takes a lot of hardware to support these virtual coins.
This Satellite Finder Can Watch Amateur TV
Setting up satellite dishes can be a finicky business. To aid in the alignment of these precision antennas, satellite finders are often used which can display audio and video feeds from the satellite while also providing signal strength readouts for accurate adjustment. However, these devices can also be used in interesting ways for more terrestrial purposes (Youtube link).
Using the DMYCO V8 Finder, [Corrosive] demonstrates how to set up the device to pick up terrestrial amateur streams. Satellite reception typically involves the use of a low-noise block downconverter, which downconverts the high frequency satellite signal into a lower intermediate frequency. Operating at the 1.2GHz amateur band, this isn’t necessary, so the device is configured to use an LNB frequency of 10000, and the channel frequency entered as a multiple of ten higher. In this case, [Corrosive] is tuning in an amateur channel on 1254 MHz, which is entered as 11254 MHz to account for the absent LNB.
[Corrosive] points out that, when using an F-connector to BNC adapter with this setup, it’s important to choose one that does not short the center pin to the shield, as this will damage the unit. This is due to it being designed to power LNBs through the F-connector for satellite operation.
By simply reconfiguring a satellite finder with a basic scanner antenna, it’s possible to create a useful amateur television receiver. If you’re wondering how to transmit, [Corrosive] has that covered, too. Video after the break.
This 3D Printer Is Soft On Robots
It always seems to us that the best robots mimic things that are alive. For an example look no further than the 3D printed mesh structures from researchers at North Carolina State University. External magnetic fields make the mesh-like “robot” flex and move while floating in water. The mechanism can grab small objects and carry something as delicate as a water droplet.
The key is a viscous toothpaste-like ink made from silicone microbeads, iron carbonyl particles, and liquid silicone. The resulting paste is amenable to 3D printing before being cured in an oven. Of course, the iron is the element that makes the thing sensitive to magnetic fields. You can see several videos of it in action, below.
Obviously, these structures aren’t going to replicate Robbie the Robot any time soon. However, in the paper published in Advanced Materials Technologies, the researchers identify creating active tissue scaffolds for cell cultures and mimicking creatures that dwell on water surfaces as two possible applications.
The device requires a single electromagnet for activation. However, it did make us think about using more conventional magnetic materials and external magnetic fields to perform tasks. It Seems as if it wouldn’t be that hard to do.
There’s a lot going on in the world of soft robotics lately, such as this jellyfish, for example. Or this stingray made from rat cells.
Recover Data From Damaged Chips
Not every computer is a performance gaming rig. Some of us need cheap laptops and tablets for simple Internet browsing or word processing, and we don’t need to shell out thousands of dollars just for that. With a cheaper price tag comes cheaper hardware, though, such as the eMMC standard which allows flash memory to be used in a more cost-advantageous way than SSDs. For a look at some the finer points of eMMC chips, we’ll turn to [Jason]’s latest project.
[Jason] had a few damaged eMMC storage chips and wanted to try to repair them. The most common failure mode for his chips is “cratering” which is a type of damage to the solder that holds them to their PCBs. With so many pins in such a small area, and with small pins themselves, often traditional soldering methods won’t work. The method that [Jason] found which works the best is using 0.15 mm thick glass strips to aid in the reflow process and get the solder to stick back to the chip again.
Doing work like this can get frustrating due to the small sizes involved and the amount of heat needed to get the solder to behave properly. For example, upgrading the memory chip in an iPhone took an expert solderer numerous tries with practice hardware to finally get enough courage to attempt this soldering on his own phone. With enough practice, the right tools, and a steady hand, though, these types of projects are definitely within reach.
Wednesday, January 30
3D Printed Wheels Get Some Much Needed Grip
You’d be hard-pressed to find more ardent supporters of 3D printing then we here at Hackaday; the sound of NEMA 17 steppers pushing an i3 through its motions sounds like a choir of angels to our ears. But we have to admit that the hard plastic components produced by desktop 3D printers aren’t ideal for a number of applications. For example, the slick plastic is useless for all but the most rudimentary of wheels. Sure there are flexible filaments that can give a printed wheel a bit of grip, but they came with their own set of problems (not to mention, cost).
 In the video after the break, [Design/Forge] demonstrates a clever method for fitting polyurethane rubber “tires” onto 3D printed hubs which is sure to be of interest to anyone who’s in the market for high quality bespoke wheels for their project. The final result looks extremely professional, and while there’s a considerable amount of preparation that goes into it, once you’re set up you should be able to pump these out quickly and cheaply.
The process begins with a 3D printed mold pattern, which includes the final tire tread texture. This means you can create tire treads of any design you wish, which should have some creative as well as practical applications. The printed part is then submerged in silicone rubber and allowed to cure for 8 hours. Once solidified, the silicone rubber becomes the mold used for the next steps, and the original printed part is no longer needed.
The second half of the process is 3D printing the wheels to which the tires will be attached. These will be much smaller than the original 3D printed component, and fit inside of the silicone mold. The outside diameter of the printed wheel is slightly smaller than the inside diameter of the mold, which gives [Design/Forge] the space to pour in the pigmented polyurethane rubber. The attentive viewer will note that the 3D printed wheel has a slight ribbed texture designed into it, so that there will be more surface area for the polyurethane to adhere to. Once removed from the mold and cleaned up a bit, the final product really does look fantastic; and reminds us of a giant scale LEGO wheel.
Whether you’re casting metal parts or just want a pair of truly custom earbuds, creating silicone molds from 3D printed parts is an extremely useful skill to familiarize yourself with. Though even if you don’t have a 3D printer, there’s something to be said for knowing how to mold and cast real-world objects as well.
[Thanks to Itay for the tip.]
Pen Plotter From Salvaged Printer Parts
Like many of us, [Benjamin Poilve] was fascinated when he took apart a broken printer. He kept the parts, but unlike most of us, he did something with them, building a neat little plotter called the Liplo. Most pen plotters work by moving the pen on two axes, but [Benjamin] took a different approach, using the friction drive bars from the printer to move the paper on one axis, and a servo to move the pen on the other. He’s refined the design from its initial rough state to create a very refined final product that uses a combination of salvaged, 3D-printed, and CNC-milled parts.
The Liplo is driven by a Teensy 3.1 and an Eibot board to drive the motors. [Benjamin] was planning to offer the plotter a kit on Kickstarter, but life got in the way. His loss is our gain, as he is now offering the plans and code for this neat build for free. If this one doesn’t plot your desires, we’ve seen lots of other home built plotters recently, including this one made from a 3D printer, and even one made of cardboard.
AI Patent Trolls Now on the Job for Drug Companies
Love it or loathe it, the pharmaceutical industry is really good at protecting its intellectual property. Drug companies pour billions into discovering new drugs and bringing them to market, and they do whatever it takes to make sure they have exclusive positions to profit from their innovations for as long a possible. Patent applications are meticulously crafted to keep the competition at bay for as long as possible, which is why it often takes ages for cheaper generic versions of blockbuster medications to hit the market, to the chagrin of patients, insurers, and policymakers alike.
Drug companies now appear poised to benefit from the artificial intelligence revolution to solidify their patent positions even further. New computational methods are being employed to not only plan the synthesis of new drugs, but to also find alternative pathways to the same end product that might present a patent loophole. AI just might change the face of drug development in the near future, and not necessarily for the better.
Many Paths to Progress
In most industries, a patent is a simple concept: come up with a new idea, and if it proves to be novel, non-obvious, and useful, chances are good that a patent will be granted that prevents anyone but the owner from making, using, selling, or importing the covered invention for a certain period of time. The rub to the patent process is that the application must reveal everything about the invention publicly, which means that after the exclusivity period has expired, anyone can profit from the original inventor’s work.
Pharmaceuticals, though, are treated differently. Since it’s relatively easy to reverse engineer a chemical compound using analytical chemistry tools and methods, patents for drugs concentrate on the process used to arrive at the desired endpoint. Most drugs are relatively simple organic compounds whose creation is a long, complicated series of reactions. They’ll often start with a couple of simple compounds, reacted together under just the right conditions to yield an intermediate compound. That product is then perhaps purified before being mixed with a fourth compound, and the process continues. Functional groups are added or subtracted at each step until the final compound is created in sufficient quantity and quality.
Every step in the process is claimed in the process patent application so that the resulting patent is as broad as possible. But it doesn’t stop there. There may be more than one way to skin the synthetic cat, and every single feasible alternative synthesis needs to be covered by the application too. Chemists at pharmaceutical companies spend a lot of effort looking for and plugging these potential patent loopholes.
AI to the Rescue
Both the design of the best, most commercially viable synthesis and the search for loopholes are perfect applications for AI. Syntheses can be broken down into well-defined steps governed by rules that an expert system can rapidly churn through, searching for a path from a known starting point to the desired product. Researchers at the Polish Academy of Sciences and the Ulsan National Institute of Science and Technology in South Korea had previously shown that an application called Chematica can autonomously generate a synthetic plan for a group of seven well-known drugs from simple starting materials. (Chematica was recently purchased by Merck and seems to have been rebranded as Synthia.) Each plan was generated in about 20 minutes and verified by chemists, who followed the synthetic instructions in the lab and came up with the right endpoints.
 As a follow-up, the same team turned that process around, using Chematica to search for “retrosynthetic” paths to three new endpoints. This time, the products were blockbuster drugs with billions in sales and presumably air-tight patent positions. The researchers gave Chematica some rules, making certain key synthetic steps off-limits to the algorithm and forcing it to find alternate ways to the same product. To their surprise, paths to each of endpoints were discovered that successfully evaded the patent-infringing steps.
The implications of this development are potentially far-reaching. In the first instance, it seems like Chematica and similar tools will quickly become an aid to the intuitive, creative process of designing an organic synthesis. Such applications could also put a fair number of chemists out of a job, when it can do in 20 minutes what a chemist might take weeks or months to accomplish.
On the other hand, AI applications like these stand to stifle competition. The more airtight the patent position for a drug, the longer the patent owner can maintain a monopoly on that drug. Using AI to test for loopholes around the synthetic process only solidifies the claims, making it less likely that generic versions of a drug will reach the market in a timely fashion.
Taken at face value, the use of AI to both explore new routes to drug synthesis and find potential patent loopholes is a fascinating use of technology. But like anything else, the devil is in the details, and when such systems are inevitably put into widespread use, it’s likely that the ones that end up paying the price of progress will be the consumers.
The Roomba lawnmower is finally happening
-

The iRobot Terra. Check out that huge antenna. [credit: iRobot ]
iRobot is the biggest name in home robotics thanks to its Roomba line, a robotic army of indoor cleaning bots that will suck up the dust and dirt on your floors. But what about that other giant flat surface you own that constantly needs maintaining? For that, the Roomba lawnmower is finally here: the iRobot Terra.
A Roomba lawnmower has been rumored for years. The company has robomower patents going all the way back to 2008, and as recently as 2015 the company was petitioning the FCC to allow it to make its outdoor beacon navigation system legal. The original Roomba was introduced in 2002, when iRobot mostly had the home-robotics market to itself. Waiting 17 years to tackle the great outdoors means iRobot is now jumping into a crowded field of competitors, and it will have to do battle with Robomow, Husqvarna's Automower line, Honda's Miimo, and a line of mowers from Worx, among others.
A lot of the Roomba basics make the trip to the outdoors. The Terra is still a battery-powered robot that wheels around your property. It has all the usual self-docking capabilities that allow it to park itself on the outdoor charger when it's low on power, and it can pick up right where it left off. It uses the same "Home" app as the Roomba, so you can relax indoors and still monitor the robot as it toils in the hot sun.
Read 3 remaining paragraphs | Comments


Supportless Overhangs: Just Reorient Gravity by 90 Degrees
The 3D print by [critsrandom] in the image above may not look like much at first glance, until one realizes that the 90 degree overhang has no supports whatsoever. Never mind the messy bottom surface, and never mind that the part shown might avoid the problem entirely with some simple supports or a different print orientation; the fact that it printed at all is incredible.
 [critsrandom] shared the method in a post on Reddit, and it consists simply of laying the 3D printer on its side. When the print head reaches the overhang, the fact that it is printing sideways is what allows that spot to make the leap from “impossible” to merely “messy”. Necessary? Probably not, but a neat trick nevertheless.
Tilted 3D printers is something that we’ve seen in the past, but for different reasons. When combined with a belt-driven build platform, a tilted printer has a theoretically infinite build volume (in one axis, anyway.)
Micro Milling: Tips for Smaller CNC Projects
 Move up to the next level by going small on your CNC machine
The post Micro Milling: Tips for Smaller CNC Projects appeared first on Make: DIY Projects and Ideas for Makers.
Hands-on with the new Gmail for Android (and iOS)
-

The new Gmail. It's very white. [credit: Ron Amadeo ]
Google is pushing a big redesign to the mobile Gmail app on Android and iOS. The update was announced yesterday, and after spending some time with the new app, we're going to comb through the finer details and see what has changed between New Gmail and Old Gmail.
For now the release is only out on Android, but like the old Gmail design, it should look identical on iOS. If you're on Android, you want Gmail version 9.x (the old design is Gmail 8). If the Play Store isn't serving you the update and you're into sideloading, APKMirror has a safe download. The iOS version is still wending its way through the App Store approval process, and should be out sometime this week.
The new design is a good match for the new desktop Gmail design that came out in April, along with all the other apps using the "Google Material Theme" design language. Everything is really white—an homage to the Google homepage—and everything uses rounded corners. The horizontal line dividers are gone, leaving nothing but white space to separate your messages. Control iconography is changed to Google's new outline style, and while message text remains in the Roboto font, everything else now uses Product Sans (the same typeface as the Google logo).
Read 9 remaining paragraphs | Comments


The all-new 2019 Mazda 3 punches far above its weight for under $30,000
-

This is the all-new Mazda 3, which uses the company's new Skyactiv-Vehicle architecture. [credit: Mazda ]
LOS ANGELES—I'll admit it, I always look forward to the launch of a new Mazda. Other brands might give you ten minutes of Cliff's Notes on the car before throwing you the keys and pointing you at the nearest twisty ribbon of tarmac; by contrast, the Hiroshima-based OEM's events always feel more like a grad school seminar. (I think that's a good thing, but that's probably why I have this job.)
In this regard, the launch of the brand-new Mazda 3 did not disappoint. The car is a clean-sheet design, the first to use the all-new Skyactiv-Vehicle architecture. And before we got to try it out in a mix of LA traffic and the Angeles Crest Highway, the engineers and designers responsible gave us plenty of insight into how they went about updating Mazda's best-selling car. The result is a refreshingly human-centered vehicle from an OEM that continues to live up to Jinba Ittai—its internal philosophy of making a car and its driver feel as one.
As with previous generations, the new Mazda 3—which goes on sale in March—will be available as a sedan (starting at $21,000) or a five-door hatchback (starting at $23,600). Eventually, you'll be able to option one with Mazda's clever new Skyactiv-X spark-controlled compression ignition engine, but at launch all US cars will come equipped with the same 2.5L four-cylinder Skyactiv-G power unit. There is a choice between front- and all-wheel drive, though, and at least some cars will even be available with a manual transmission.
Read 20 remaining paragraphs | Comments


Infrared Brute Force Attack Unlocks TiVo
While the era of the TiVo (and frankly, the idea of recording TV broadcasts) has largely come to a close, there are still dedicated users out there who aren’t quite ready to give up on the world’s best known digital video recorder. One such TiVo fanatic is [Gavan McGregor], who recently tried to put a TiVo Series 3 recorder into service, only to find the device was stuck in the family-friendly “KidZone” mode.
Without the code to get it out of this mode, and with TiVo dropping support for this particular recorder years ago, he had to hack his way back into this beloved recorder on his own. The process was made easier by the simplistic nature of the passcode system, which only uses four digits and apparently doesn’t impose any kind of penalty for incorrect entries. With only 10,000 possible combinations for the code and nothing to stop him from trying each one of them in sequence, [Gavan] just needed a way to bang them out.
 After doing some research on the TiVo remote control protocol, he came up with some code for the Arduino using the IRLib2 library that would brute force the KidZone passcode by sending the appropriate infrared codes for each digit. He fiddled around with the timing and the delay between sending each digit, and found that the most reliable speed would allow his device to run through all 10,000 combinations in around 12 hours.
The key thing to remember here is that [Gavan] didn’t actually care what the passcode was, he just needed it to be entered correctly to get the TiVo out of the KidZone mode. So he selected the “Exit KidZone” option on the TiVo’s menu, placed his Arduino a few inches away from the DVR, and walked away. When he came back the next day, the TiVo was back into its normal mode. If you actually wanted to recover the code, the easiest way (ironically) would be to record the TV as the gadget works its way through all the possible digits.
Back in 2004, there were so many TiVo hacks hitting the front page of Hackaday that we actually gave them a dedicated subdomain. But by the end of 2007, we were asking what hackers would do with the increasingly discarded Linux-powered devices. That people are still hacking on these gadgets over a decade later is truly a testament to how dedicated the TiVo fanbase really is.
[Thanks to Chris for the tip.]
Build Retro Games with Script-8
A whole generation of programmers learned to program by writing — or at least typing in — game programs for relatively simple computers like a TRS-80, a Commodore 64, or any of a handful of similar machines. These days, games are way more complicated and so are computers. Sure, it is more fun to play Skyrim than Snake, but for learning, you are probably going to get more out of starting with a simple game. If you want to learn programming today — or maybe start someone else on that same journey, you should check out Script-8, a project by [Gabriel Florit]. You can get a taste of how it looks in the video below, or just surf over to the site and play or modify a game (hint: press “a” to launch the ball).
Instead of paraphrasing, here’s the excellent elevator speech from the web site:
SCRIPT-8 is a fantasy computer for making, sharing, and playing tiny retro-looking games (called cassettes). It’s free, browser-based, and open-source. Cassettes are written in JavaScript.
In some cases, Script-8 might be even better than the old machines. Everything you do causes an immediate reaction. There’s a variety of tools that let you pause and rewind action, a sprite editor, a map editor, and even a music editor.
It is easy enough to copy an existing “cassette” to a blank so you can make changes, so you don’t have to start from scratch, even though you can. Your workspace is 128 pixels square and only shows 8 colors, but that adds to the retro look and feel of the games.
Honestly, JavaScript is a bit harder than the old BASIC, but it is also way more practical in the modern world. If you really want BASIC, though, you can do that on the Web, too. Or you can relive yesteryear with a modern take on QuickBasic.
The Tiniest RetroPie
The RetroPie project is a software suite for the Raspberry Pi that allows the user to easily play classic video games through emulators. It’s been around for a while now, so it’s relatively trivial to get this set up with a basic controller and video output. That means that the race is on for novel ways of implementing a RetroPie, which [Christian] has taken as a sort of challenge, building the tiniest RetroPie he possibly could.
The constraints he set for himself were to get the project in at under 100 mm. For that he used a Pi Zero loaded with the RetroPie software and paired it with a 1.44″ screen. There’s a tiny LiPo battery hidden in there, as well as a small audio amplifier. Almost everything else is 3D printed including the case, the D-pad, and the buttons. The entire build is available on Thingiverse as well if you’d like to roll out your own.
While this might be the smallest RetroPie we’ve seen, there are still some honorable mentions. There’s one other handheld we’ve seen with more modest dimensions, and another one was crammed into an Altoids tin with a clamshell screen. It’s an exciting time to be alive!
Continuous Computing The Analog Way
When your only tool is a hammer, everything starts to look like a nail. That’s an old saying and perhaps somewhat obvious, but our tools do color our solutions and sometimes in very subtle ways. For example, using a computer causes our solutions to take a certain shape, especially related to numbers. A digital computer deals with numbers as integers and anything that isn’t is actually some representation with some limit. Sure, an IEEE floating point number has a wide range, but there’s still some discrete step between one and the next nearest that you can’t reduce. Even if you treat numbers as arbitrary text strings or fractions, the digital nature of computers will color your solution. But there are other ways to do computing, and they affect your outcome differently. That’s why [Bill Schweber’s] analog computation series caught our eye.
One great example of analog vs digital methods is reading an arbitrary analog quantity, say a voltage, a temperature, or a shaft position. In the digital domain, there’s some converter that has a certain number of bits. You can get that number of bits to something ridiculous, of course, but it isn’t easy. The fewer bits, the less you can understand the real-world quantity.
For example, you could consider a single comparator to be a one-bit analog to digital converter, but all you can tell then is if the number is above or below a certain value. A two-bit converter would let you break a 0-3V signal into 1V steps. But a cheap and simple potentiometer can divide a 0-3V signal into a virtually infinite number of smaller voltages. Sure there’s some physical limit to the pot, and we suppose at some level many physical values are quantized due to the physics, but those are infinitesimal compared to a dozen or so bits of a converter. On top of that, sampled signals are measured at discrete time points which changes certain things and leads to effects like aliasing, for example.
There was a time when it wasn’t clear analog computers wouldn’t dominate. But although they failed to win the computing architecture war, they are still around. As [Bill] points out, analog processing still occurs where you need cheap, fast, or continuous computations.
We’ve only seen part one of the series so far, but it is a great read, laying out the basics and why analog computing is still important. For example, an AC power meter might use a few op-amps to replace a pretty significant digital computing capability.
If you want to be pedantic, yes physical quantities sometimes have quantization — you can’t have a fraction of an electron charge, for example. It is also true that analog computing may introduce some small delay as circuitry settles. But, in general, pushing a digital system to be more precise than the physical quantization or to work faster than an analog computer is very difficult. A few resistors and op-amps are cheap and simple. No real time operating system required. No special techniques for dealing with discrete time measurements.
[Bill] also points out that even a slide rule is an analog computer, of sorts. There was even a time you could even get an analog laptop computer. Sort of.
Don’t Toss That Bulb, It Knows Your Password
Whether it was here on Hackaday or elsewhere on the Internet, you’ve surely heard more than a few cautionary tales about the “Internet of Things” by now. As it turns out, giving every gadget you own access to your personal information and Internet connection can lead to unintended consequences. Who knew, right? But if you need yet another example of why trusting your home appliances with your secrets is potentially a bad idea, [Limited Results] is here to make sure you spend the next few hours doubting your recent tech purchases.
In a series of posts on the [Limited Results] blog, low-cost “smart” bulbs are cracked open and investigated to see what kind of knowledge they’ve managed to collect about their owners. Not only was it discovered that bulbs manufactured by Xiaomi, LIFX, and Tuya stored the WiFi SSID and encryption key in plain-text, but that recovering said information from the bulbs was actually quite simple. So next time one of those cheapo smart bulb starts flickering, you might want to take a hammer to it before tossing it in the trash can; you never know where it, and the knowledge it has of your network, might end up.
 Regardless of the manufacturer of the bulb, the process to get one of these devices on your network is more or less the same. An application on your smartphone connects to the bulb and provides it with the network SSID and encryption key. The bulb then disconnects from the phone and reconnects to your home network with the new information. It’s a process that at this point we’re all probably familiar with, and there’s nothing inherently wrong with it.
The trouble comes when the bulb needs to store the connection information it was provided. Rather than obfuscating it in some way, the SSID and encryption key are simply stored in plain-text on the bulb’s WiFi module. Recovering that information is just a process of finding the correct traces on the bulb’s PCB (often there are test points which make this very easy), and dumping the chip’s contents to the computer for analysis.
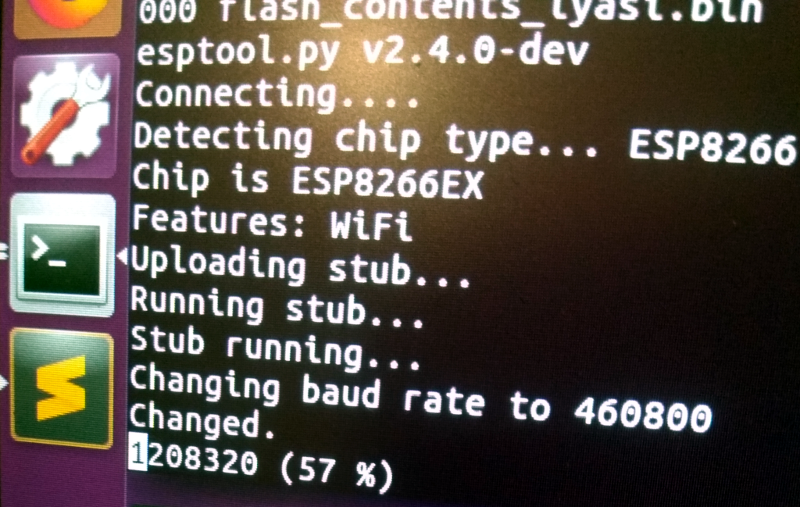
It’s not uncommon for smart bulbs like these to use the ESP8266 or ESP32, and [Limited Results] found that to be the case here. With the wealth of information and software available for these very popular WiFi modules, dumping the firmware binary was no problem. Once the binary was in hand, a little snooping around with a hex editor was all it too to identify the network login information. The firmware dumps also contained information such as the unique hardware IDs used by the “cloud” platforms the bulbs connect to, and in at least one case, the root certificate and RSA private key were found.
On the plus side, being able to buy cheap smart devices that are running easily hackable modules like the ESP makes it easier for us to create custom firmware for them. Hopefully the community can come up with slightly less suspect software, but really just keeping the things from connecting to anything outside the local network would be a step in the right direction.
Tuesday, January 29
Follow The Bouncing Needles Of This Analog Meter Clock
Our community never seems to tire of clock builds. There are seemingly infinite ways to mark the passage of time, and finding unique ways to display it is endlessly fascinating.
There’s something about this analog voltmeter clock that really seems to have caught on with the Redditors who commented on the r/DIY thread where we first spotted this. [ElegantAlchemist]’s design is very simple – just a trio of moving coil meters with nice industrial-looking bezels. The meters were wired for 300 volts AC, so the rectifier and smoothing cap were removed and the series resistance was substituted for one more appropriate for the 0-5VDC range needed for the project. New dial faces showing hours, minutes and seconds were whipped up in Corel Draw, and everything was put into a sturdy and colorful aluminum “stomp box” normally used for effects pedals. An Arduino Nano and an RTC drive the meters with a nice, bouncy action. Simple, cheap to build, and a real crowd pleaser.
The observant reader will note a similarity to a clock we covered a while back. That one chose 3D-printed cases for an airplane instrument cluster look. We like the spare case design in [ElegantAlchemist]’s build, but wonder how this clock would look in a fine wood case.
Google revamps Gmail for Android and iOS
-

The new Gmail. Also, wow, Google remembered that Android tablets exist. [credit: Google ]
Since the launch of Android P, Google has been hard at work rolling out its new "Google Material Theme" design language across all of its products. Desktop Gmail got its big redesign early in 2018, and this week is mobile Gmail's turn. On its official blog today, Google announced the new Gmail mobile design for Android and iOS.
We only have a few basic pictures to go on right now, but like every other Google Material redesign, the new Gmail app is best described as "white and round." Google's new design language uses the stark white Google.com homepage as inspiration, so its new apps are almost entirely devoid of color. The big red header from the old Gmail app has been swapped out for a white search bar, so the only touches of color are from contact pictures, labels, and attachments.
Besides the new color scheme, Google says you'll be able to "quickly view attachments—like photos—without opening or scrolling through the conversation." The top search bar promotes search more, and it also houses your profile icon on the right side, which lets you change accounts faster.
Read 2 remaining paragraphs | Comments


New DOD missile defense strategy: Star Wars II, the Wrath of Trump
Captions available here. (video link)
It's been 36 years since President Ronald Reagan announced the Strategic Defense Initiative (SDI), an effort to develop technologies to counter intercontinental ballistic missiles including orbital systems that could detect and take out ICBMs with lasers or kinetic weapons. That program, dismissively called "Star Wars" by Senator Ted Kennedy, was seen as massively destabilizing from a strategic perspective—until the Soviets stopped objecting in 1987 because they realized it would never work. SDI was officially terminated in 1993, as the US focused instead on the threat of shorter-range ballistic missiles by "rogue states" in the wake of the Gulf War.
In 2019, "Star Wars" is back. While President George W. Bush got the ball rolling in 2002 with the formation of the Missile Defense Agency (MDA) and an exit from the Anti-Ballistic Missile Treaty, President Donald Trump's new missile defense strategy seeks to expand the MDA's efforts by returning to a quest for a space-based missile shield and other weapons that could, as Trump put it in a January 17 speech, "detect and destroy any missile launched against the US from anywhere at any time."
Read 8 remaining paragraphs | Comments


Interfacing The Sidewinder Joystick to AVRs
The Sidewinder line was a series of gaming peripherals produced by Microsoft, starting in the 1990s. After some initial stumbles, several cutting edge joysticks were released, at a time when the home computer market was in a state of flux, transitioning from legacy interfaces like serial and parallel to the more modern USB. In this interim period, Sidewinder joysticks used a special method to communicate digitally over the game port interface, which more typically used a kludge to read joysticks in an analog manner. [MaZderMind] managed to reverse engineer this protocol, and implemented the interface on an AVR microcontroller.
The technology is loosely described in US Patent 5628686, which discusses the method used to communicate bidirectionally with the Sidewinder joystick. [MaZderMind] found that the patent documents didn’t correspond exactly with how the Sidewinder Precision Pro communicated, but it was close enough that the operation could be reverse engineered.
The plan is to use the vintage joystick to control a quadcopter, so the interface was implemented on an AVR, and a graphical LCD installed to act as a display for testing the operation. [MaZderMind] also captured data on an oscilloscope to indicate in detail the quirks of the joystick’s operation.
Yes, it’s entirely possible to use a more modern microcontroller with a USB joystick. However, there are few that measure up to the standards of the old Sidewinder hardware, and sometimes the best tool for the job is the one you’ve got with you. A traditional single joystick is a different take on quadcopter control, but there’s other options – gesture control is possible, too.
Step inside NYC’s competitive slotcar racing scene
-
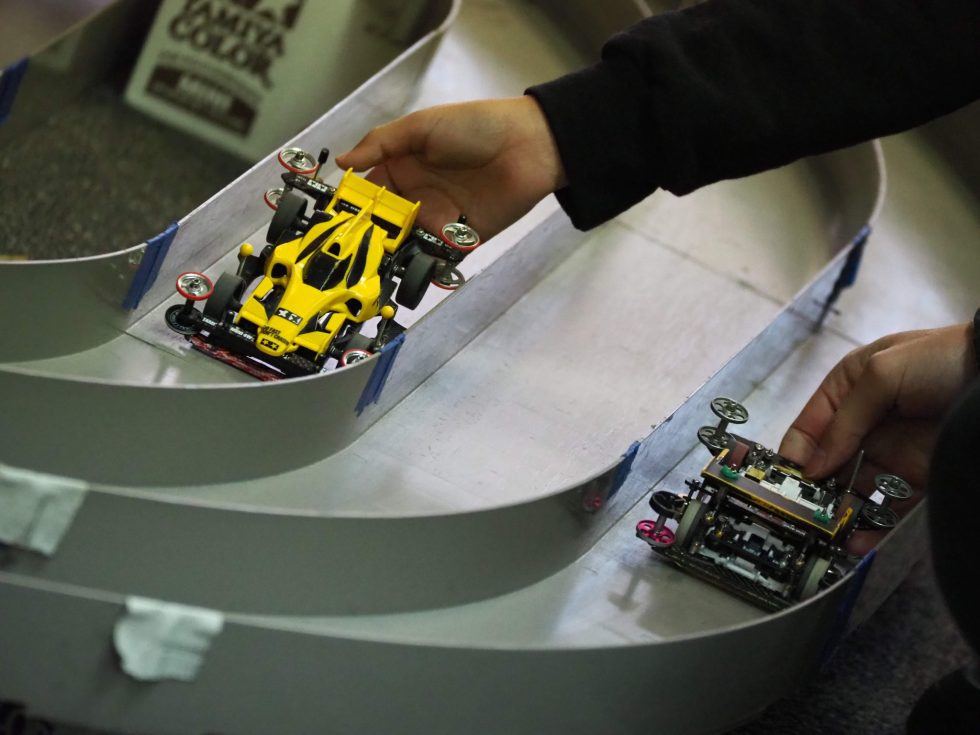
On your mark: Racers steady their Tamiya Mini 4WD models during a monthly race at Brooklyn's Rui Yong Hobby. [credit: Gregory Leporati ]
At least once a month, an unassuming storefront in Sunset Park, Brooklyn transforms into a fierce battleground. Inside, a small crowd cheers and groans as miniature cars dart across a winding track, batteries buzzing as the tiny vehicles twist and turn like Formula 1 cars running through the streets of Monaco. On the final lap, one car speeds into a chicane and flips off the track as spectators gasp.
"This is like a chess match," says Noel Lopez, the race's champion. "You have no control after you place your car on the track, but that's part of the fun."
It's just another race day at Rui Yong Hobby, a local shop in NYC that hosts monthly Tamiya Mini-Four-Wheel Drive (4WD) tournaments. The competitions regularly draw a group of 20 or more hobbyists hailing from all across the city and beyond, all itching to put their customized cars to the test.
Read 22 remaining paragraphs | Comments

