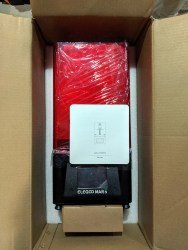
Resin-based 3D printers using stereolithography (SLA) and especially digital light processing (DLP) are getting more common and much more affordable. Prosumer-level options like Formlabs and the Prusa SL1 exist, but more economical printers like the Elegoo Mars, Anycubic Photon, and more can be had for a few hundred bucks. Many printers and resin types can even be ordered directly from Amazon, right at this moment.
Resin prints can look fantastic, so when does it make sense to move to one of these cheap DLP printers? To know that, consider the following things:
- The printing process and output of resin printers is not the same as for filament-based printers. Design considerations, pre-processing, and post-processing are very different.
- Resin printing has a different workflow, with consumables and hidden costs beyond the price of resin refills.
Things may not be quite where fused deposition modeling (FDM) printers were just a few short years ago when we were extremely impressed with the quality of printer one could get for about $200, but it is undoubtedly far more accessible than ever before. Let’s look at how to inform a decision about whether to take the plunge.
The Right Print for the Job
FDM printers deposit molten plastic with a hot nozzle, while SLA/DLP printers use an ultraviolet light source to cure liquid UV resin into a solid. Both build a three dimensional object one layer at a time, always building the next layer on the foundation of the previous layer.
So far so same, but in practice they have very different workflows and produce different results, and are therefore good at different things.
This means that when it comes to good design, what’s intuitive for filament-based printers doesn’t necessarily carry over. For example, when 3D printing resin:
Print Sizes are Small
Compared to FDM printers, build platforms for resin may seem revoltingly small. The more economical DLP printers have build platforms that are roughly the size of a cell phone screen. Which, as it so happens, is exactly where their LCDs are coming from (with the addition of a UV backlight to cure the resin).
The Model is Under Stress Between Each Layer
A “peel” process pulls the model off of the build surface after every layer, and the model must withstand this. Each new layer must be on a strong foundation, and the best way to ensure a good foundation is with supports. A model orientation that offers a minimal cross-section (and therefore minimal area per layer) will reduce peel forces.
Rafts and Multiple Supports are the Norm
With FDM printing supports are often avoidable, but not so with resin. Supports provide overall structure and strength to the model as it is subjected to forces that FDM prints don’t need to worry about. Rafts and supports are the norm, not the exception.
Virtually No Tolerance for Overhangs and Bridging
Compared to FDM printers, resin printing will seem as though it has virtually no tolerance for overhangs. With FDM, an unsupported overhang may result in a droopy edge or poor surface quality, but with resin printing that unsupported bit is likely to break or float away (or remain stuck to the build surface), contaminating the resin and interfering with the print. A part orientation that makes layer changes as gradual as possible will minimize the steepness of overhangs, and therefore minimize the need for supports.
Resin Prints Require More Extensive Post-processing
Prints must be rinsed free of uncured resin by washing in isopropyl alcohol and allowed to dry. After that, they may possibly require exposure to UV for additional curing (more on all that in a moment.)
Be Mindful of Cups and Islands When Orienting Prints
Cups are hollow parts of a model that can create a suction force against the build surface during the peel process. This suction can weaken or distort in-progress prints. Cups are avoided by ensuring drainage holes or other gaps exist to break any potential suction.
Islands are parts of a model that start separate from each other, but join up together later in the print. With resin printing it’s best to avoid them, especially if they are thin or long, or if the part has precise dimensional requirements. Tall or thin islands will lack the stable foundation of the rest of the model, and as they print and peel over and over again, they can shift slightly. By the time they join back up with the rest of the model, they may not be as precise as expected (assuming they don’t break off before then.)
Handle Resin (and Unrinsed Parts) with Gloves
All operations involving uncured resin should be done with gloves (and ideally eye protection.) If resin gets on skin, wash it off promptly with soap and water.
The majority of pre-print model tweaking will mainly consist of finding an optimal model orientation that balances the need for supports with the desire to minimize the post-processing burdens caused by a large forest of supports.
How is the Workflow Different From FDM?
Here are the general steps involved between IMPORT MODEL and RECEIVE PRINT that highlight the differences filament-based and resin printers:
Pre-Processing:
- Choose a model orientation that offers a good balance between a manageable number of supports, and providing enough structure to withstand peeling forces.
- Avoid cups, overhangs, unsupported bridges, and islands.
- Try to have details and presentation surfaces on the opposite face of supports as much as possible.
Printer Setup:
- Set up the build platform and build tank. If changing resin types, ensure both have been cleaned first.
- Pour in the resin. Avoid exposing the resin to light. Wear gloves and eye protection, and follow all safety precautions (which generally boil down to “don’t get it on your skin, and if you do, wash it off immediately.”)
- Avoid mixing resin types, which can have different properties and exposure time requirements.
Post-Printing:

- After printing, the part will resemble a hard plastic thing dripping with syrupy resin. Rinse the uncured resin away by washing the part in isopropyl alcohol, and allow the part to dry.
- Some resins require additional post-print curing. This can be done with a DIY cure box or by leaving the part in sunlight.
- Remove supports with flush cutters (or by snapping them off if the surface finish isn’t important) then proceed with other post-processing like sanding or painting. Dealing with supports — especially in delicate areas — is a big enough issue that I made a tool to make removing them easier.
I have two other observations related to the materials and general workflow: ventilation and temperature.
Ventilation is good for the printing and handling area, because some uncured resins have a prominent, acrid sort of plastic smell to them. (Though standard Formlabs resins do not, in my experience, have any particular odor. Nor do their standard resins require any additional post-print UV curing.)
Temperature has an effect on the cure time of resins. The cooler the resin, the slower it cures. Printers without temperature-controlled build tanks (i.e. all of the economical ones) will benefit from a work area that is kept at a stable room temperature for the most consistent results.
When Resin Printing Makes Sense
Mashing BUY on an economical resin printer from your favorite retailer absolutely makes sense if you are ready to accept or deal with each of the following:
- Build volume will limit you to small objects.
- Prep, maintenance, and handling can be messy and requires gloves. Ventilation is good due to the smell of some resins, and the need to wash finished prints in alcohol.
- Consumables include more than the resin and alcohol for part washing. The build surface of the tank must also be replaced periodically. For hobbyist DLP printers, this is a thin plastic film like the skin of a drum. With Formlabs printers, it’s part of the build tank.
- The setup and cleanup process for resin must be done regardless of job size, so it’s more efficient to do prints in batches rather than one-offs that are few and far between. Resin also has a limited shelf life, so resin sitting in a build tank should be used sooner rather than later.
- There is a higher post-processing burden in the form of part washing, additional curing, and support removal.
 All of this means that there are hidden costs to resin printing beyond the price of the printer and a bottle of resin. If those things look acceptable, then by all means take advantage of the economical options available for desktop resin printing and start experimenting. Because when prints come out well, they can look fantastic.
Just keep in mind that a resin printer isn’t likely to replace your filament-based printer, because they are different tools that are good at different things.
Not ready to take the plunge? Prototyping with FDM and outsourcing a resin print is always an option. For those of you who have already gotten started, what are your experiences with resin printing? Any tips for the rest of us? Let us know in the comments!

No comments:
Post a Comment