Saturday, November 30

Let A CPR Robot Save The Day

Four highschool students in Lyon France are building a CPR robot, with the aim of removing the endurance problem faced by those delivering this form of essential first aid.

By every after action report, CPR is an emotionally and physically exhausting way to save a life. When someone’s heart stops beating their breathing stops too. After that there’s a very small window in which to keep just enough oxygen in the blood to prevent brain damage and organ failure. A person has to precisely position their hands and press, repeatedly, with enough force to break someone’s sternum in order to keep their heart pumping; sometimes for over fifteen minutes waiting for rescue to arrive. On top of that, depending on which school of thought they learned the technique, they may be required to also force air into the patients lungs.

While this pushes the boundary of human endurance, a robot would not have the same issue. In fact, many of the existing problems are solved. CPAP Machines can force air into lungs all day long. A motor and a mechanism could position and provide the mechanical pumping motion to keep the blood flowing. Sensors could tell when the heart takes back over. The machine is currently a proof-of-concept built from plywood, and off-the-shelf parts. Yet it can maintain the 30 compression – 2 breath cycle indefinitely on a CPR Dummy.

It’s an interesting idea; while defibrillators do exist, they don’t always get the heart going in time. We wonder if someone more medically inclined can weigh in on this interesting idea.

Never Surrender celebrates 25 years of Galaxy Quest’s comic perfection

Trailer for Never Surrender: A Galaxy Quest Documentary.

Galaxy Quest, the glorious 1999 science fiction action comedy starring Tim Allen and Sigourney Weaver (among others), will turn 25 on December 25 of this year. And what better way to celebrate this important milestone than with a documentary feature? Never Surrender: A Galaxy Quest Documentary is an entertaining, heartfelt tribute that comes to us (believe it or not) from the same folks behind the wildly popular online Honest Trailers series.

(Spoilers for Galaxy Quest below.)

The premise of the movie is deceptively simple: what if aliens watched transmissions of a popular science fiction TV show from Earth and thought it was real? An alien race called the Thermians model their entire society on the principles of a fictional Galaxy Quest TV show, building real, functional versions of the spaceship and much of the technology from the series. When their very existence is threatened by a reptilian humanoid general from another species named Roth'h'ar Sarris, they travel to Earth to ask their heroes for help—arriving in the middle of a Galaxy Quest fan convention.

Read 13 remaining paragraphs | Comments

Multi Material 3D Printing Makes Soft Robot

When you zoom in on a fractal you find it is made of more fractals. Perhaps that helped inspire the Harvard 3D printers that have various arrays of mixing nozzles. In the video below you can see some of the interesting things you can do with an array of mixing nozzles. The coolest, we think, is a little multi-legged robot that uses vacuum to ambulate across the bench. The paper, however, is behind a paywall.

There are really two ideas here. Mixing nozzles are nothing new. Usually, you use them to mimic a printer with two hot ends. That is, you print one material at a time and purge the old filament out when switching to the new filament. This is often simpler than using two heads because with a two head arrangement, both the heads have to be at the same height, you must know the precise offset between the heads, and you generally lose some print space since the right head can’t cross the left head and vice versa. Add more heads, and you multiply those problems. We’ve also seen mixing nozzles provide different colors.

The printers in the video, can lay down filament of different types and achieves very rapid change overs. According to the authors:

… exploit(s) the diode-like behaviour that arises when multiple visco-elastic materials converge at a junction to enable seamless, high-frequency switching between up to eight different materials…

This should be within reach of existing hobby-level mixing hot ends, although perhaps it requires different materials than we currently use.

In addition to the robot, there is a folding origami-like structure that uses both rigid and flexible plastic. The only thing that struck us is that while the array of nozzles makes fast prints with repetitive structure, it didn’t seem possible to turn them off. So the things you could print with, say, an 8-head nozzle would be very limited by the spacing between the nozzles since all the nozzles print together.

Still, this could be a good research project for anyone with a mixing hotend. The capability is even available on tiny printers. If you want to mix four filaments, there’s always the diamond. If you get results — positive or negative — experimenting with this technique, write it up, hit us with a tip, and we’ll pass it along.

Quantum computing’s also-rans and their fatal flaws 

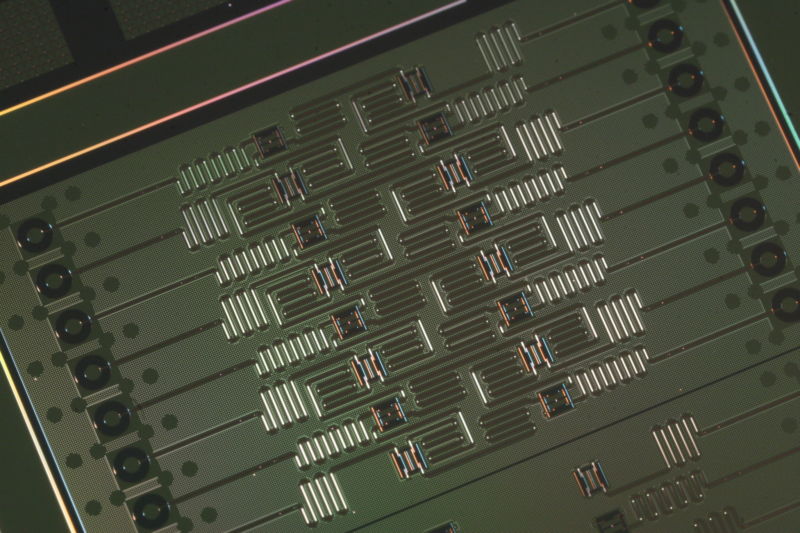
Extreme closeup of computer chip.

Enlarge / IBM's 16-qubit quantum computer from 2017. (credit: IBM quantum experience)

Last month, Google claimed to have achieved quantum supremacy—the overblown name given to the step of proving quantum computers can deliver something that a classical computer can't. That claim is still a bit controversial, so it may yet turn out that we need a better demonstration.

Independently of the claim, it's notable that both Google and its critics at IBM have chosen the same type of hardware as the basis of their quantum computing efforts. So has a smaller competitor called Rigetti. All of which indicates that the quantum-computing landscape has sort of stabilized over the last decade. We are now in the position where we can pick some likely winners and some definite losers.

Why are you a loser?

But why did the winners win and the losers lose?

Read 22 remaining paragraphs | Comments

Circuit Simulation in Python

Using SPICE to simulate an electrical circuit is a common enough practice in engineering that “SPICEing a circuit” is a perfectly valid phrase in the lexicon. SPICE as a software tool has been around since the 70s, and its open source nature means there are more SPICE tools around now to count. It also means it is straightforward enough to use with other software as well, like integrating LTspice with Python for some interesting signal processing circuit simulation.

[Michael]’s latest project involves simulating filters in LTspice (a SPICE derivative) and then using Python/NumPy to both provide the input signal for the filter and process the output data from it. Basically, it allows you to “plug in” a graphical analog circuit of any design into a Python script and manipulate it easily, in any way needed. SPICE programs aren’t without their clumsiness, and being able to write your own tools for manipulating circuits is a powerful tool.

This project is definitely worth a look if you have any interest in signal processing (digital or analog) or even if you have never heard of SPICE before and want an easier way of simulating a circuit before prototyping one on a breadboard.

Google attempts to protect users from sketchy stem cell clinics

Google logo seen during Google Developer Days (GDD) in Shanghai, China, September 2019.

Enlarge / Google logo seen during Google Developer Days (GDD) in Shanghai, China, September 2019. (credit: Lyu Liang | VCG | Getty Images)

Transplanted stem cells can be as lifesaving as donated organs, but the Food and Drug Administration in September warned consumers that some stem cell clinics only pretend to be in the business of miraculous recoveries.

Now, Google is attempting to protect its users after years of showing ads for questionable stem cell treatments. The company stated that it will stop allowing "bad actors" to post Google ads that "take advantage of individuals by offering untested, deceptive treatments." Enforcement of the new policy started at the end of October, said Google spokesperson Alex Krasov. That change, while helpful, is unlikely to shutter clinics that cloak themselves in a façade of reputable science in order to peddle questionable stem cell treatments.

The risky business of unproven treatments

Different types of stem cell treatments are at varying stages of development. Transplants of bone-marrow stem cells are well-established treatments for a number of cancers. But the identification of other types of stem cells has allowed researchers to develop new therapies that are just beginning to enter clinical testing. Unfortunately, many stem cell clinics have latched on to the hype and are offering unapproved treatments for which there is no experimental evidence.

Read 10 remaining paragraphs | Comments

Simple Acrylic Plates Make Kirlian Photography a Breeze

We know, we know – “Kirlian photography” is a term loaded with pseudoscientific baggage. Paranormal researchers have longed claimed that Kirlian photography can explore the mood or emotional state of a subject through the “aura”, an energy field said to surround and emanate from all living things. It’s straight-up nonsense, of course, but that doesn’t detract from the beauty of plasma aficionado [Jay Bowles]’ images produced by capacitive coupling and corona discharge.

Technically, what [Jay] is doing here is not quite Kirlian photography. The classic setup for “electrophotography” is a sandwich of photographic film, a glass plate, and a metal ground plate. An object with a high-voltage, high-frequency power supply attached is placed on top of the sandwich, and the resulting corona discharge exposes the film. [Jay]’s version is a thin chamber made of two pieces of solvent-welded acrylic and filled with water. A bolt between the acrylic panes conducts current from a Tesla coil – perhaps this one that we’ve featured before – into the water. When something is placed on the acrylic, a beautiful purple corona discharge streams out from the object.

It’s an eerie effect, and it’s easy to see how people can see an aura and attribute mystical properties to it. In the end, though, it’s not much different than touching a plasma globe, and just about as safe. Feeling a bit more destructive? Corona discharge is a great way to make art, both in wood and in acrylic.

Robot vs. Superbug

Working in a university or research laboratory on interesting, complicated problems in the sciences has a romanticized, glorified position in our culture. While the end results are certainly worth celebrating, often the process of new scientific discovery is underwhelming, if not outright tedious. That’s especially true in biology and chemistry, where scaling up sample sizes isn’t easy without a lot of human labor. A research group from Reading University was able to modify a 3D printer to take some of that labor out of the equation, though.

This 3D printer was used essentially as a base, with the printing head removed and replaced with a Raspberry Pi camera. The printer X/Y axes move the camera around to all of the different sample stored in the print bed, which allows the computer attached to the printer to do most of the work that a normal human would have had to do. This allows them to scale up massively and cheaply, presumably with less tedious inputs from a large number of graduate students.

While the group hopes that this method will have wide applicability for any research group handling large samples, their specific area of interest involves researching “superbugs” or microbes which have developed antibiotic resistance. Their recently-published paper states that any field which involves bacterial motility, colony growth, microtitre plates or microfluidic devices could benefit from this 3D printer modification.

Building Your Own Tensegrity Structure

It seems that tensegrity structures are trending online, possibly due to the seemingly impossible nature of their construction. The strings appear to levitate without any sound reason, but if you bend them just the right way they’ll succumb to gravity. 

The clue is in the name. Tensegrity is a pormanteau of “tension” and “integrity”. It’s easiest to understand if you have a model in your hand — cut the strings and the structure falls apart. We’re used to thinking of integrity in terms of compression. Most man-made structures rely on this concept of engineering, from the Empire State Building to the foundation of apartment building.

Tensegrity allows strain to be distributed across a structure. While buildings built from continuous compression may not show this property, more elastic structures like our bodies do. These structures can be built on top of smaller units that continuously distribute strain. Additionally, these structures can be contracted and retracted in ways that “compressionegrities” simply can’t exhibit.

How about collapsing the structure? This occurs at the weakest point. Wherever the load has the greatest strain on a structure is where it will likely snap, a property demonstrable in bridges, domes, and even our bodies.

Fascinated? Fortunately, it’s not too difficult to create your own structures.

[Thanks Alan for the tip!]

Making Your Own Chain Sprockets, The Tidy Way

Chain sprockets are a key drivetrain component in a lot of builds. Unfortunately they can be difficult to source, particularly for those outside the reach of retailers like McMaster-Carr. In such situations, you might consider making your own.

The toothed profile on a chain sprocket can be produced in a simple manner by drawing a base circle, along with a series of circles spaced appropriately for the chain in question. This involves measuring the pitch and roller diameter of the chain. With these measurements in hand, a template can be created to produce the sprocket.

From there a series of holes are drilled to rough out the basic shape of the teeth, before the sprocket is then cut down to its appropriate outer diameter. The finishing work consists of chamfering the sprocket’s thickness, as well as the filing the sharp edges of the teeth for smooth engagement.

It’s a quick and easy method for producing sprockets with well-defined, accurate profiles. We’ve featured other rough and ready methods before, too. Video after the break.

Dub Siren Synth Does It The Old School Way

There’s little that can compare to the sheer obnoxious thrill of mashing the DJ siren when its your turn behind the decks. We’ve certainly been guilty of abusing the privilege at local house parties, and unsurprisingly have not been invited back. If we ever get another shot, though, we’d be glad to have [lonesoulsurfer]’s dub siren at the ready.

This is a build for the old-school purists. There’s no microcontrollers or digital hardware here. The synth relies on two 555 timer ICs as the oscillators and an LM741 op-amp. These parts harken right back to the dawn of the integrated circuit era, and still do a great job in this application. There’s also a cheap reverb/echo module added in to fatten up the sound. It’s all laced up in an old CB radio enclosure, with the classic woodgrain applique doing much to add to the aesthetic.

It’s a build that’s simple enough for the electronics beginner, and would make a great tactile, analog addition to any DJ’s rig. If you need some wubwubs to go with your woowoos, then consider building a Ball of Dub, too.

Friday, November 29

Landbeest, A Single Servo Walking Robot

Walking robots have a rich history both on and off the storied pages of Hackaday, but if you will pardon the expression, theirs is not a field that’s standing still. It’s always pleasing to see new approaches to old problems, and the Landbeest built by [Dejan Ristic] is a great example.

It’s a four-legged walker with a gait dictated by a cam-and-follower mechanism that allows it to perform the full range of leg movement with only one motor. Each cam can control more than one leg in synchronisation, and in his most recent prototype, there are two such mechanisms that work on opposite corners of a four-legged machine. The legs are arranged in such a way that the two corner-to-corner pairs pivot at their centres in a similar manner to a pair of scissors; allowing a servo to steer the robot as it walks.

The result certainly isn’t as graceful as [Theo Janssen]’s Strandbeest, from which it evidently takes inspiration for its name, but it’s no less capable for it. After the break you can see a video he’s posted which clearly illustrates its operation and demonstrates its ability to traverse obstacles.

The only thing that’s missing are the files and software should you wish to create your own. He’s unapologetic about this, pointing out that he’d prefer to wait until he is satisfied with it before letting it go. Since he’s put a lot of work in so far and shows no sign of stopping, we’re sure he’ll reach that point soon enough.

Dealmaster: The best Black Friday gaming deals for PS4, Switch, and Xbox

The Nintendo Switch.

Enlarge / The Nintendo Switch. (credit: Photo Illustration by Guillaume Payen/SOPA Images/LightRocket via Getty Images)

Today is Black Friday, and that means lots of video game deals. While the annual shopping event is still filled with offers that push mediocre products or prices that aren't particularly low, many of the gaming deals the Dealmaster has found across various retailers are genuinely worth your time.

On the PlayStation side of things, that includes $100 off the 4K-ready PlayStation 4 Pro, with the standalone console and a bundle that includes Call of Duty: Modern Warfare currently down to $299. The standard "Slim" PS4, meanwhile, is down to $199; that's about $80-100 off where we normally see it online, but Sony is packaging God of WarHorizon Zero Dawn: Complete Edition, and The Last of Us: Remastered with the console as part of its holiday season bundle. For context, those three games usually sit in the $10-20 range these days. (All of them are also pretty good, if you haven't tried them already.) This deal does appear to be running out of stock pretty quickly, though.

A bundle of the company's PlayStation VR headset that includes two games and two PlayStation Move motion controllers is also discounted to $250. That's roughly a $100 discount and about as low as we see it at major retailers. An additional bundle that included five games but no Move controllers was available for $200 earlier this week, but that unfortunately looks to be out of stock at major retailers on Black Friday itself.

Read 7 remaining paragraphs | Comments

DSP Spreadsheet: Talking to Yourself Using IQ

We’ve done quite a bit with Google Sheets and signal processing: we’ve generated signals, created filters, and computed quadrature signals. We can pull all that together into an educational model for two SDRs talking to each other, but it’s going to require two parts: modulation and demodulation. Guess what? We can do that with a spreadsheet.

The first step is to generate a reference clock for the carrier. You’ll need a cosine wave (I) and sine wave (Q). Of course, you also need the time base. That’s columns A-C in the spreadsheet and works like other signal generation we’ve seen.

The Plot Thickens

Think about the IQ plot of what we have so far. Plotting IQ means putting I on the X axis of a graph and Q on the Y axis. When I=1, Q=0. That’s a spot right on the X axis at X=1. The same thing happens, but flipped around when I=-1. It also happens when I=0 and Q=1, but rotated 90 degrees. The key is that, in each case, the length of the vector is 1. Every spot, in fact, will have a length of 1 because sin2(x)+cos2(x)=1. If you look at the first 12 rows of the spreadsheet with default values, you’ll see that X and the Y move between 1 and -1 in such a way that the sum of their squares is always 1.

What does that mean? It means the IQ reference signal will draw a circle of radius 1 on the IQ plot. If we multiply both by the same amount, the radius will change, but you’ll still get a circle. That’s AM or amplitude modulation. You can think about a few other things, too. For example, if I and Q were exactly the same (an easy change to make in the spreadsheet; just set both columns to the sine or cosine), the phase angle will always be 45 degrees or 225 degrees. and the amplitude would always be the square root of two (assuming the original signals go from -1 to 1). Multiplying both by the same number will change the amplitude of the signal, but not the phase.
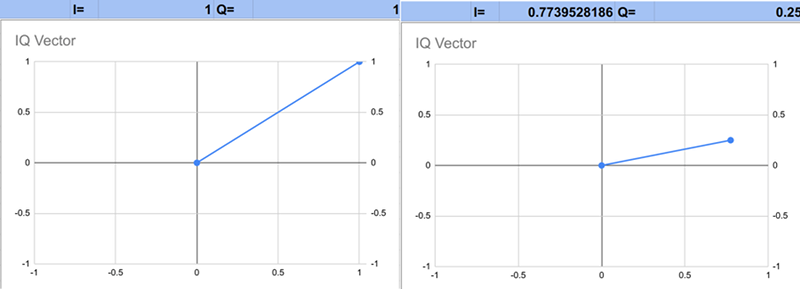
Multiplying one part of the IQ by some number and not the other will cause a change in phase. Imagine the part of the graph where I and Q make a 45-degree angle — that is, I=Q. If you make Q bigger, it must change the angle of the vector. So by manipulating the reference IQ signal we can create amplitude modulation or phase modulation and changing phase can also create frequency modulation.

Put it to the Test

In real life, you might have two stations both using DSP techniques to transmit and receive. In that case, the transmitter generates a reference IQ signal, manipulates it, and winds up putting out a single RF signal to the antenna.

The receiver can’t know for sure if the sending station is using DSP or not, but it doesn’t matter. The signal is the same either way. The receiver will generate its own IQ reference signal and reverse the transformation. Sort of. The problem is, there’s no way to know if the transmitter’s reference signal is in phase with the receiver’s. However, the relative phases will be the same and that’s all you care about if you even care about the phase at all.

There’s one other issue. When you recover the signal it will ride with a higher frequency signal that you’ll need to filter out. Luckily, we already know how to do that.

In the Sheets

Here’s how to read the spreadsheet. The main tab is where most of the action is. You can set the usual parameters at the top. The first three columns are the time base and the IQ reference signal. I’ll cheat and reuse these on the receive side, too. If you wanted to prove it would still work if the reference signals were out of phase, you could easily make the modification.

The rest of the columns up to column G are modulating the IQ reference. The resulting “radio” signal is in column G. This is both the output of the transmitter and the input to the receiver.

The receiver is in columns H and I because I reused the time base and the reference signal. If you look at the plot of the input signal and the output, you’ll see the high frequency component I mentioned.
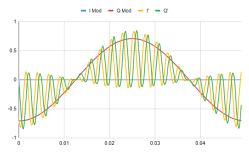
Note that the modulating signal on I and Q are the same, so you only see the Q signal (the blue I signal is directly underneath it). Although you can see the low frequency matches the modulation signal, you can switch to the second tab to filter the high frequency component out.
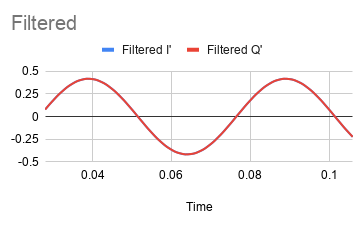
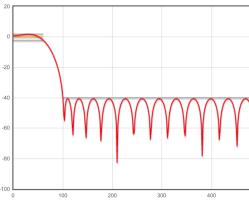
That sheet uses the FIR filter technique we talked about before. The filter has a passband from 0 Hz to 60 Hz and the stopband starts at 100 Hz. You can see a partial gain vs frequency plot. There are 57 taps, so we will miss the first 57 samples as the algorithm loads itself with data.

Of course, the filter shifts the phase of the signal and misses the first few samples, so the time axis doesn’t align, but that doesn’t matter. Without a synchronized IQ reference, there wouldn’t be any hope of phase alignment anyway.

Final Tab

The final tab takes the data and allows you to do a vector plot against any of the samples. I cheated and used a script to enable the big arrow buttons, so you may have to grant permission before that will work. However, you don’t need the buttons if you don’t mind manually changing cell E1. It takes a little work to get the spreadsheet to make nice vector diagrams:

Honestly…

In a way, it is amazing you can do this much modeling in a spreadsheet. If you were serious, you should really think about using something like Juypter or — honestly — anything else. However, if you want to learn DSP concepts, having to learn a new tool first can be pretty daunting.

Using nothing more than a spreadsheet, you can use this model to think about what happens under certain circumstances. Once you outgrow it, you can move to something like MATLAB or any of the numerous clones of it, or tackle your code in C, Python, or whatever your language of choice happens to be.

Dealmaster: AirPods, iPads, and more Apple devices on sale for Black Friday

2019 iPad

Enlarge / The 2019, seventh-generation iPad with a 10.2-inch display. (credit: Samuel Axon)

Apple devices are constantly in high demand, and yet they rarely go on sale. But for Black Friday 2019, a number of retailers have sales and discounts on some of the most popular Apple products as of late.

Let's start with Apple's wireless earbuds—AirPods are now $139 at Amazon, and that includes the standard charging case. These are the second-generation AirPods and the regular charging case; the optional wireless charging case is available separately at its regular price of $79. Regardless, this AirPods bundle gives you the essentials at a good sale price.

The new AirPods Pro are also on sale today—now you can get the new and improved earbuds for $234.98, which is about $15 off their regular price of $250. These are in-ear version of the original AirPods, which could make them more comfortable for those that found the shape of AirPods less than ideal. AirPods Pro use the same H1chip found in second-gen AirPods to pair with Apple devices, but the have active noise cancellation and "transparency mode," features that the original AirPods do not have. The former mode blocks out ambient noise, while the latter mode lets in some external sound so it's easier to hear others around you.

Read 8 remaining paragraphs | Comments

Printing Custom Shirts With The Roland BT-12

I got a chance to play with the Roland VersaStudio BT-12, which is a compact DTG printer. If you’ve never heard of DTG(Direct To Garment) before, is when you print directly onto fabric, as opposed to something like screenprinting or iron-on transfers. Typically DTG printers are quite large and cumbersome, […]

Read more on MAKE

The post Printing Custom Shirts With The Roland BT-12 appeared first on Make: DIY Projects and Ideas for Makers.

Election polls aren’t broken, but they still can’t predict the future

Stickers await residents who vote at the Parks and Recreation Center building on August 14, 2018, in Elkhorn, Wisconsin.

Enlarge / Stickers await residents who vote at the Parks and Recreation Center building on August 14, 2018, in Elkhorn, Wisconsin. (credit: Scott Olson/Getty Images)

In the days before the 2016 US presidential election, nearly every national poll put Hillary Clinton ahead of Donald Trump—up by 3%, on average. FiveThirtyEight’s predictive statistical model—based on data from state and national voter polls—gave Clinton a 71.4% chance of victory. The New York Times’ model put the odds at 85%.

Trump’s subsequent win shocked the nation. Pundits and pollsters wondered: How could the polls have been so wrong?

Trump-Clinton isn’t the only example of a recent electoral surprise. Around the world, including in the 2015 United Kingdom election, the 2015 Brexit referendum, the 2015 Israeli election, and the 2019 Australian election, results have clashed with preelection polls.

Read 26 remaining paragraphs | Comments

A Fantastic Frontier of FPGA Flexibility Found in the 2019 Supercon Badge

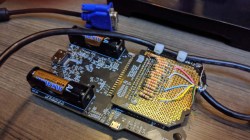
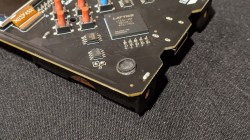
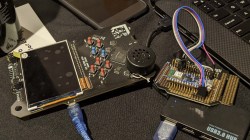
We have just concluded a successful Hackaday Superconference where a highlight for many was digging into this year’s hardware badge. Shaped in the general form of a Game Boy handheld gaming console, the heart of the badge is a large FPGA opening up new and exciting potential for badge hacking.

Beyond our normal tools of compiling custom code or modifying hardware with a soldering iron, we now have the option to change core hardware behavior with Verilog. And people explored this new frontier to great effect, as seen at the badge hacking ceremony. (Video embedded below.)

FPGAs are not new, technically speaking, why are they exciting now? We can thank their recent growth in capability, their rapidly falling cost, and the relatively new availability of open source toolchains. These developments elevated FPGA into one of the most exciting trends in hardware today, so this year’s badge master [Sprite_TM] built an open FPGA playground for several hundred of his closest Supercon friends. Let’s take a look at what people were able to accomplish in just a few days using this unique and powerful hardware.

Getting an Early Start: Custom Cartridges

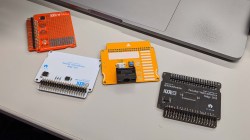
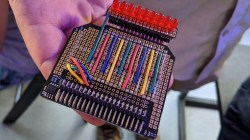
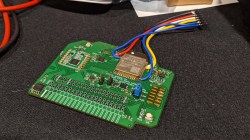
Some of the fun started even before Supercon weekend. Badge development was done openly with a Hackaday.io project page and public Github repositories for hardware and software. Anyone who poked around would know what to expect. Like the fact each badge comes with a blank prototype cartridge featuring on board flash memory. Upon seeing the design for the cartridge, a few people like [Thomas Flummer] decided to build their own custom cartridges ahead of Supercon. We love seeing the enthusiasm for a piece of hardware they had not yet touched.

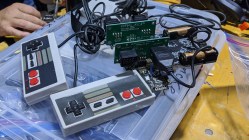
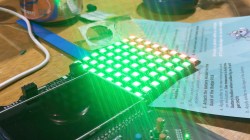
Others started with the canvas that was the blank cartridge. Everything from a LED array neatly laid out for charlieplexing, to [Ben Hencke] interfacing with Nintendo controllers for multiplayer gaming, to a VGA video output cable by [Ste Kulov], and many more.

Glorious Mono Sound

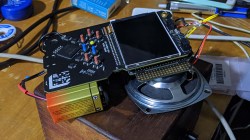
Alongside the blank cartridge, a modest little speaker was also distributed to be soldered to the audio amplifier chip and tacked in front of the badge. But word quickly spread that, if one is willing to temporarily unsolder one of the battery trays, it was possible to connect speaker wires from the back side of the badge. This simple and popular hack resulted in a tidy speaker installation. Others ignored the little speaker entirely and replaced them with larger units, some like [Emily Velasco] backed their big speakers with additional amplification.

They Blinded Me with Science LEDs and Wireless Comms

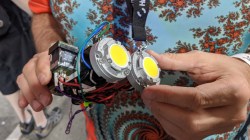
In full support of those who just want to blink an LED, the badge had several already on board and people could blink them from either C code or via Verilog. But the perf board made it easy to add more LEDs so we were in no shortage of badge lighting. From a colorful array by [Thomas Sarlandie] to a retina-destroying setup from [Garrett Mace].

On the opposite of “blink a LED” is the [Celcyon] Odin shield team, which arrived blazing with breathtaking ambitions. Their custom shield hosted not just a ESP32-WROOM-32 but also a RFM69HCW sub-GHz wireless transceiver plus supporting hardware. All this in service of their goal of turning the badge into the FPV control console for a robot, complete with video feed displaying on screen.

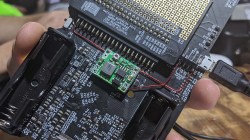
But people didn’t need to bring their own parts to have a hardware challenge on their hands. [Sprite_TM] had embedded one in the badge: The tiny onboard LEDs are actually RGB units, but unleashing their full color requires diving into schematics and Verilog. (The badge with the LED requiring reflow was an accidental master level challenge, kudos to [Ben] for making it work anyway.) [Ian Frosst] was one of several who dedicated time to solving the LED challenge. But after burning through many batteries, he made a quality-of-life hack adding a small buck converter module to run off USB power in a way that didn’t risk damaging the batteries (if present).

Truly a Choose Your Own Hardware Adventure Event

Even with the RGB challenge’s deliberate omissions, the badge offered plenty of power straight out of the box for those who prefer to stay in the software realm. We admire [Caroline] who didn’t know C programming coming into the weekend, but learned enough by the end to create a colorful palette animation demo. The gaming-inspired splash screen animations encouraged others to create splash screens from other domains. It was fun to see an old Windows startup screen on the badge.

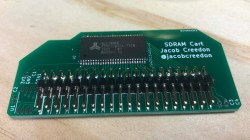
And finally, receiving the biggest applause was Linux-on-Badge: this team used all the badge hacking tricks in the book. The hardware component was a 32 MiB SDRAM cartridge by [Jacob Creedon]. The default badge SOC FPGA bitstream was entirely replaced in order to support a minimalist Linux. Much of the development was done on [Michael Welling]’s computer, guided by the precedence of a LiteX project putting Linux on the Radiona ULX3S. This is a true success story of Supercon collaboration as the team (including [Drew Fustini], [Tim Ansell], [Sean Cross], and many others) came together and worked late into nights, drawing from the massive body of collective expertise of the community.

What’s Next for These FPGA Badges?

The badge hacking ceremony may have wrapped up the weekend’s activity, but we expect it is not the end of the story. Many said they intend to continue playing with the badge after the conference, with projects ranging from 3D graphics rendering to precision motion control. It is a far more interesting piece of hardware than any FPGA manufacturer’s evaluation board, and we’d love it if project collaboration continued on our community chat channel. This badge is too good to be left gathering dust on a shelf!